
Remark: This article is a translation of my German original, created with the help of AI. English is not my first language, so some phrases may sound unusual.
Crank is an app that runs in the background and can perform different actions when something happens on your system. For example, Crank can react when headphones connect via Bluetooth or when a screenshot lands in a folder. Crank’s job is to listen for certain events, which are defined as triggers, and then start an action. It works much like Shortery, which, however, can only run Apple Shortcuts as an action. In Crank, you can also use Shortcuts as an action, and in addition scripts written in different languages.
I am interested in automation on macOS and in writing scripts, so I found Crank’s approach interesting and wanted to take a closer look. The development team The low-tech guys kindly gave me a copy of Crank for this review. The slogan “Effortless macOS automation – no manual required” made me even more curious.
Crank offers more than 30 triggers. They react to changes in the system, for example, joining a Wi-Fi network, connecting a USB device, new content in the clipboard, or a change of Focus mode. In response, Crank can perform the following actions:
- Notify: show a notification
- Open: launch an app, open a URL, open a file
- Automate: run a Shortcut, an AppleScript, or a shell script (zsh, Python 3, Ruby, Perl, Swift, or a custom interpreter)
- Control Crank: activate a profile, enable or disable a rule
At the time of this review, the app is a one-time purchase for €10.00 instead of the regular price of €14.28. You can also try it free for 14 days. It requires macOS 14.0 (Sonoma) or later.
The User Interface
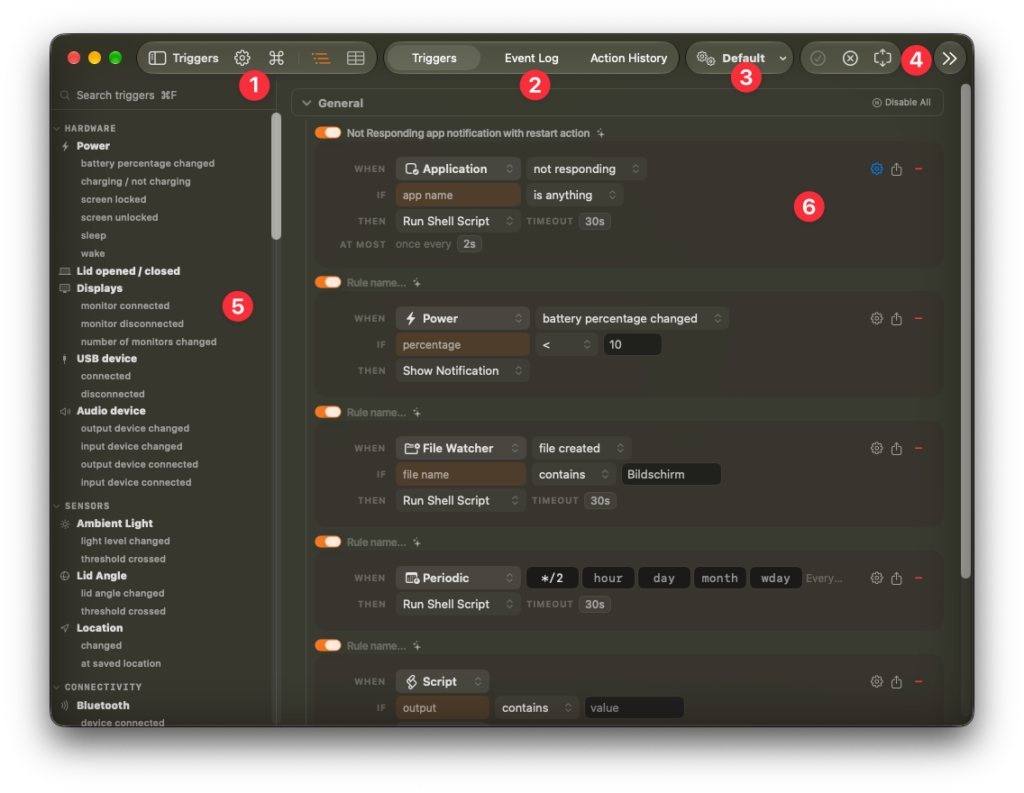
The UI is fairly self-explanatory, although it does not fully follow Apple’s conventions. The title bar contains several functions. With the buttons at (1), you can show and hide the trigger area on the left, open the settings (⌘,), open the command palette (⌘K), and switch the display of the rules (6) between the list view shown here and a table view.
With the switcher at (2), you change between three views: the “Trigger” view, the Event Log (⌘2), and the “Action History” (⌘3). The “Trigger” view is the main view. It consists of the trigger list (1) and the rules area (6), which shows the rules as a list of rule boxes. The Event Log shows all events that the system generates and that Crank watches. The Action History lists the actions that were executed, together with their output and any errors.
The button at (3) is a menu and shows the name of the active profile. When you open it, you can manage profiles and create new ones, in which you can then create new rules. With profiles, you can, for example, have a different set of rules active at work than at home. Using the context menu (right-click) of a rule, you can move it to another profile.
Area (4) contains the functions of the toolbar, shown here enlarged:

- Enable all rules
- Disable all rules
- Expand all groups
- Collapse all groups
- “DryRun”: Puts the whole system into a test mode. Crank still checks the conditions of the rules and logs the result in the Action History, but it does not execute the actions.
- Undo the deletion of a rule
- Save all settings as a backup (do not confuse this with the Share button)
- Load a backup
The Event Log
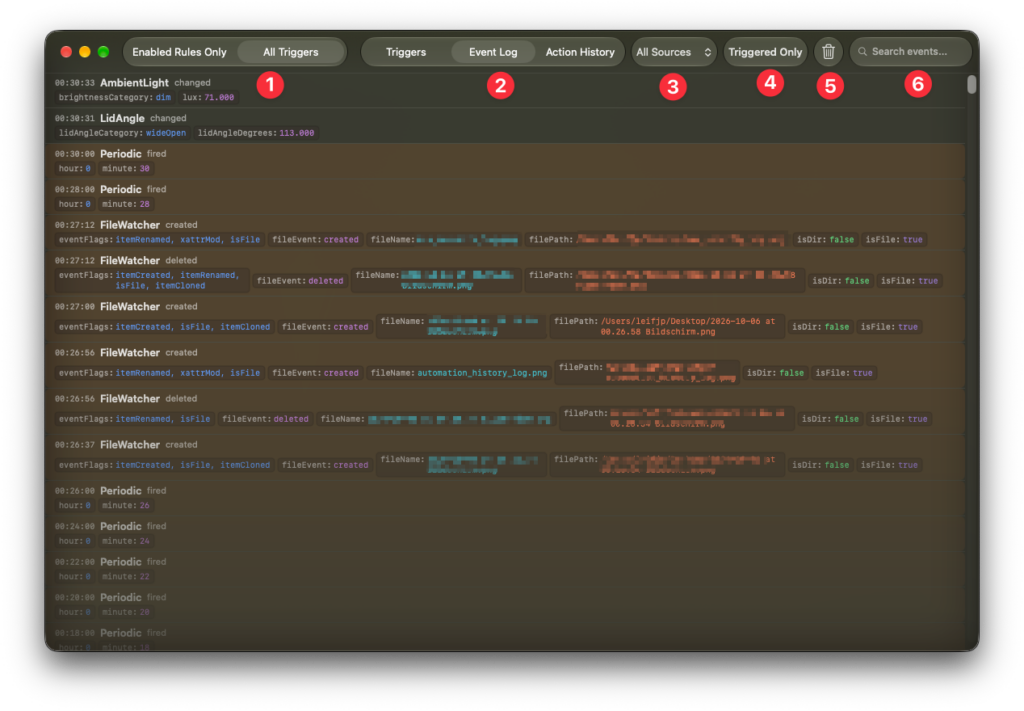
The Event Log (2) gives you an overview of the events that Crank can react to when “All Triggers” is active at (1). For debugging, you can use “Enabled Rules Only” to limit the entries to events for which active rules exist.
In the dropdown menu (3), you can filter the log by trigger area. The trash can (5) clears the log, and with the search field (6), you can look for a specific entry.
The Action History

The Action History logs the actions that were executed. Each entry shows the time, the rule, the trigger that started it, and the action. Runs that happened in DryRun mode are marked with “DRY RUN”. If you expand an entry (3), you see the output of the script, the exit code with the run time, and the values of the event that started it.
The red text is not necessarily an error. Red is used for the standard error output (stderr) of the script, and this also contains normal status messages, here for example the new name under which the screenshot was saved. The exit code shows whether an action was successful. A 0 (green) means success, anything else (red) means an error. In this way, the script in the lower entry was stopped after 30 seconds (“Script timed out after 30 seconds”, exit ‑1).
The warning triangle (1) filters the entries for actions that do not end with exit code 0, meaning they did not lead to the desired result. The trash can (1) clears the list, and with the search field (2), you can find individual entries.
How Rules Are Built
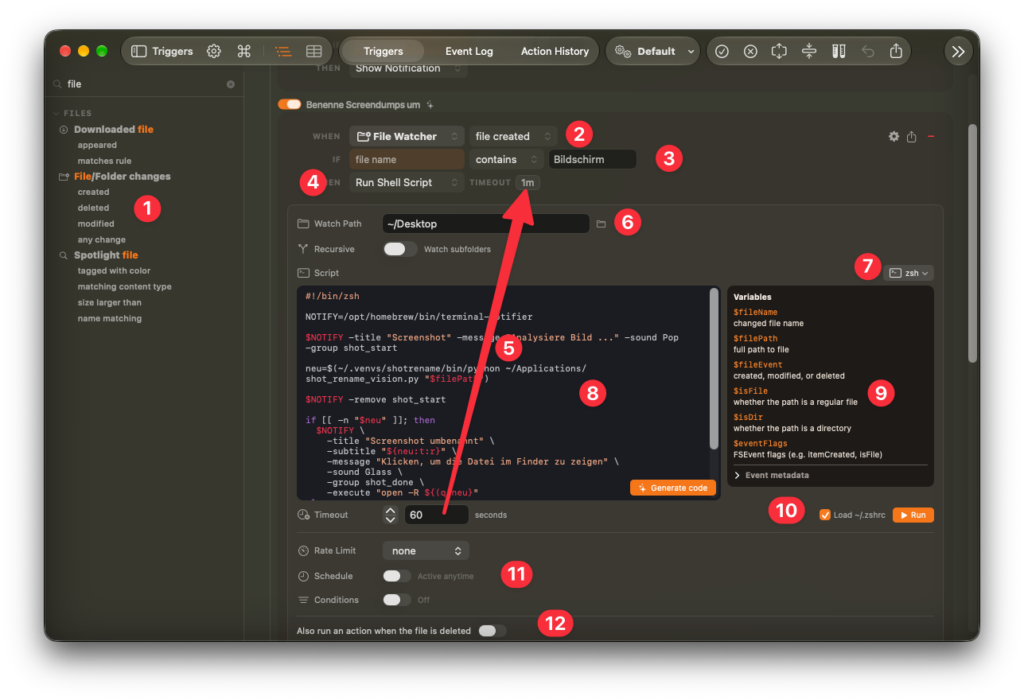
A rule always starts with a trigger, which you first select in the left sidebar (1). In this example, it is “File/Folder changes” → “created”. When you select it, the rule is created and the first line, “WHEN” (2), is added. It defines that the rule should react to events that report changes in the file system. Although the sidebar says “Files” here, the “File Watcher” also reacts to folders that are created, changed, or deleted.
In the next line, “IF” (3), you set a condition that narrows down which files or folders to watch. In the example, the file name must contain the text “Bildschirm” (the German prefix of screenshot file names).
The “THEN” line (4) defines which action should be executed, for example a Shortcut, an AppleScript, a script, or just a notification. In the example, it is “Run Shell Script”. The timeout shown here (one minute in the example) is set below the script box (5).
In the following line (6), you set the location to be watched (“Watch Path”) and whether subfolders are included (“Recursive”).
If a script should be executed, as in this example, you can choose the interpreter at (7). Besides zsh, Python 3, Ruby, Perl, and Swift, you can also specify a custom interpreter.
You enter the script in the box (8). To the right of it (9), you find the variables that you can use in the script, such as $fileName and $filePath. I will cover the button at the bottom of the script box (“Generate code”) further below.
Depending on the interpreter, additional options appear. For a zsh script, the checkbox “Load ~/.zshrc” (10) lets you decide whether the personal configuration file of the shell should also be loaded. With “Run” (10), you can execute the script directly. A Swift script can also be compiled if you want. This probably only makes sense when the script is finished, but then it speeds up execution significantly.
Below the script box, there are settings that influence how the script runs. The timeout (5) makes sure that a script that runs too long for any reason is stopped. This way, a hanging script cannot run forever. If the timeout is exceeded, the Action History shows “Script timed out” with exit code ‑1, as in the example above.
Below that are the settings “Rate Limit”, “Schedule”, and “Conditions” (11). In the “Rate Limit” dropdown menu, you can define how the rule should behave when an event is triggered several times in quick succession. One example is closing a MacBook. This triggers the “LidAngle” event, which can repeat many times. With the “Throttle” option, the action is executed at the first occurrence, and all further events are ignored for a defined time window. With “Debounce”, on the other hand, the rule waits for a defined time before it executes the action. For “LidAngle”, “Debounce” seems more useful to me, because the action is only executed after the waiting time and not already at the first change of the angle. (I have not tried this.)
With the “Schedule” option, you can define on which days of the week and in which time window the rule should be active. Under the “Conditions” switch, you can also define additional conditions that belong to the trigger. If the File Watcher looks for a specific file name (3) in a specific folder (6), as in the example, you can also set here that only changes to folders, not to files, are considered. This means the conditions are spread over three places: the file name in the IF line (3), the location in “Watch Path” (6), and further ones under “Conditions”. I do not understand why they are not combined in one place.
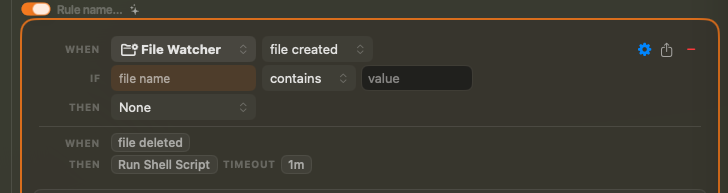
With the last option (12), “Also run an action when the file is deleted”, you can additionally define an action for the opposite event, here the deletion of the file. When you turn on the switch, a second “WHEN” line with the opposite trigger (“file deleted”) appears in the upper part of the rule, and you can define a separate action for it (see image). Here, too, I do not understand why the switch is placed at the bottom of the rule and not where the definition happens afterward.
Creating Rules and Scripts with AI
Creating a rule is quite easy. First you choose the right trigger, then you set the condition, and finally you choose an action. Simple actions, such as a notification when the battery level drops below a certain value, or opening a URL when the computer starts, can be put together quickly with a few clicks. When the action becomes more complex, it takes more effort. The easiest way may then be an Apple Shortcut as the action, because with macOS 27, Apple supports creating Shortcuts with the help of “Apple Intelligence”. You only need to describe what the Shortcut should do. Apple Intelligence does the rest.
The Code Generator in Crank
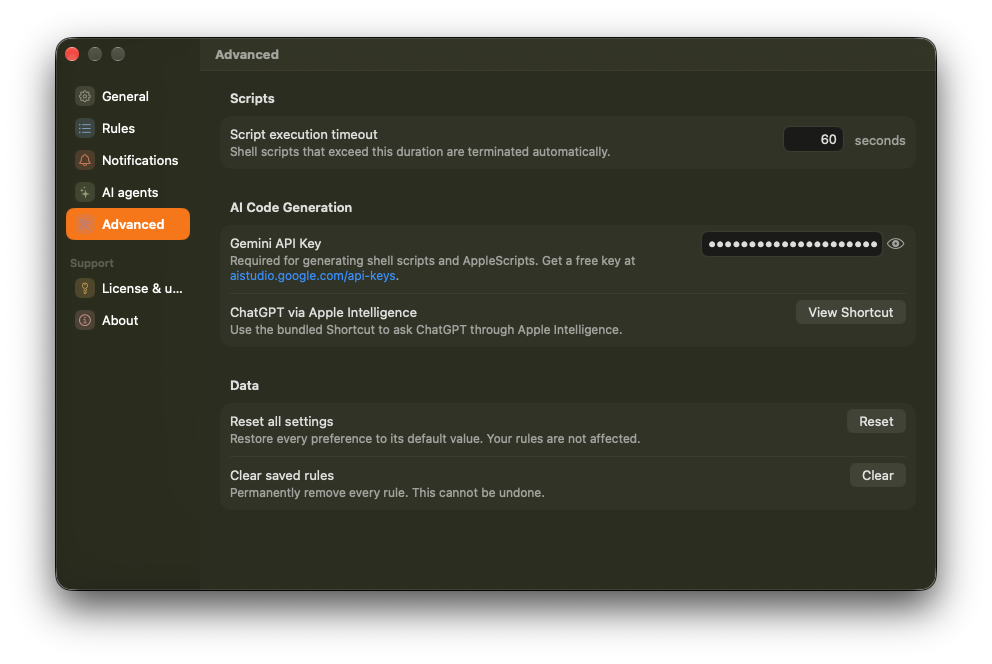
Crank takes a similar approach with its built-in code generator. In the settings under “Advanced”, you can enter a free API key from Google Gemini. You create the key with a free Google account at aistudio.google.com/api-keys. Alternatively, you can use ChatGPT through Apple Intelligence. For this, Crank installs Apple Shortcuts that serve as the interface.
For a new rule, you now enter an instruction instead of a script, here with the request to create a Swift script:
Create a Swift script that speaks the file name and the path when a new file is created in the folder, in German: Die Datei wurde im Pfad erstellt

After you click “Generate code”, the script is created. In this example, I used my free ChatGPT account through the “Apple Intelligence” interface, because calls to the Gemini API in my free account are interrupted from time to time because of overload.
After you approve the execution of the Shortcut, the finished script is inserted in place of the prompt:
#!/usr/bin/swift
import Foundation

let env = ProcessInfo.processInfo.environment
guard let fileName = env["fileName"], let filePath = env["filePath"] else {
    exit(1)
}

let message = "Die Datei \(fileName) wurde im Pfad \(filePath) erstellt"

let task = Process()
task.launchPath = "/usr/bin/say"
task.arguments = [message]
task.launch()
task.waitUntilExit()

exit(0)
Controlling Crank with MCP
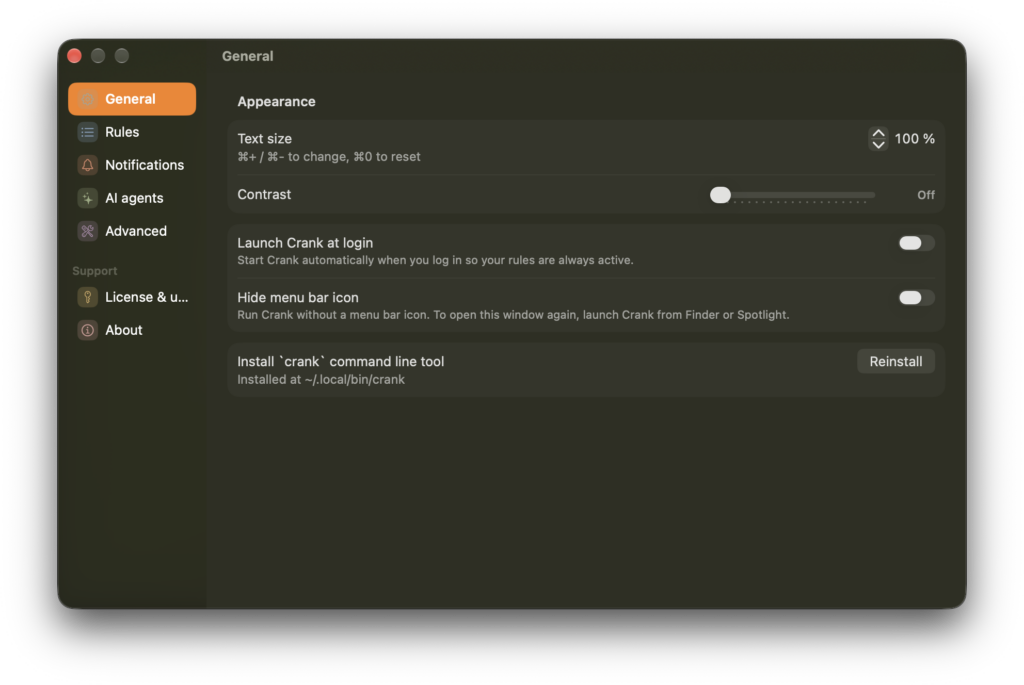
The second option is that an AI such as Claude, either in the desktop app or with Claude Code in the terminal, controls Crank directly. For this, you first need to install the “crank command line tool” in the settings under “General”.
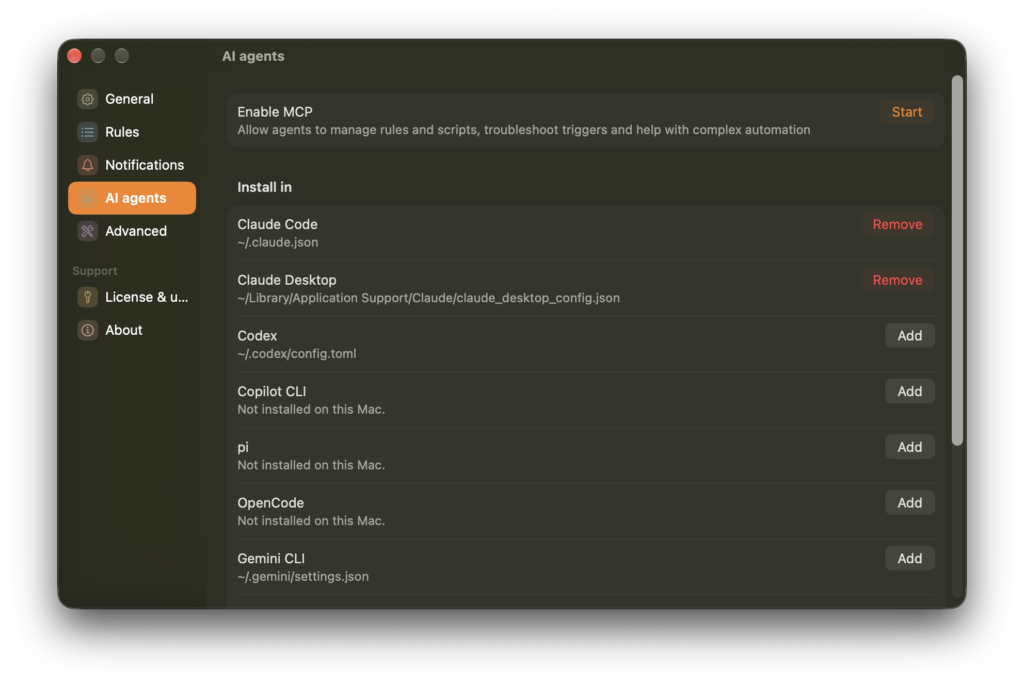
After that, you can start the Crank MCP server under “AI agents” (“Enable MCP”) and connect it to an AI agent, here Claude Code and the Claude desktop app. MCP (“Model Context Protocol”) is an interface through which AI applications can use external tools. Crank also supports other AI agents, such as Codex from OpenAI, GitHub’s Copilot CLI, OpenCode, and Google’s Gemini CLI.
With this, you can create rules by prompt directly in the app or in the terminal tool of the respective AI provider. To do this, Claude connects to Crank, gets the information it needs, creates the code, and tests it.
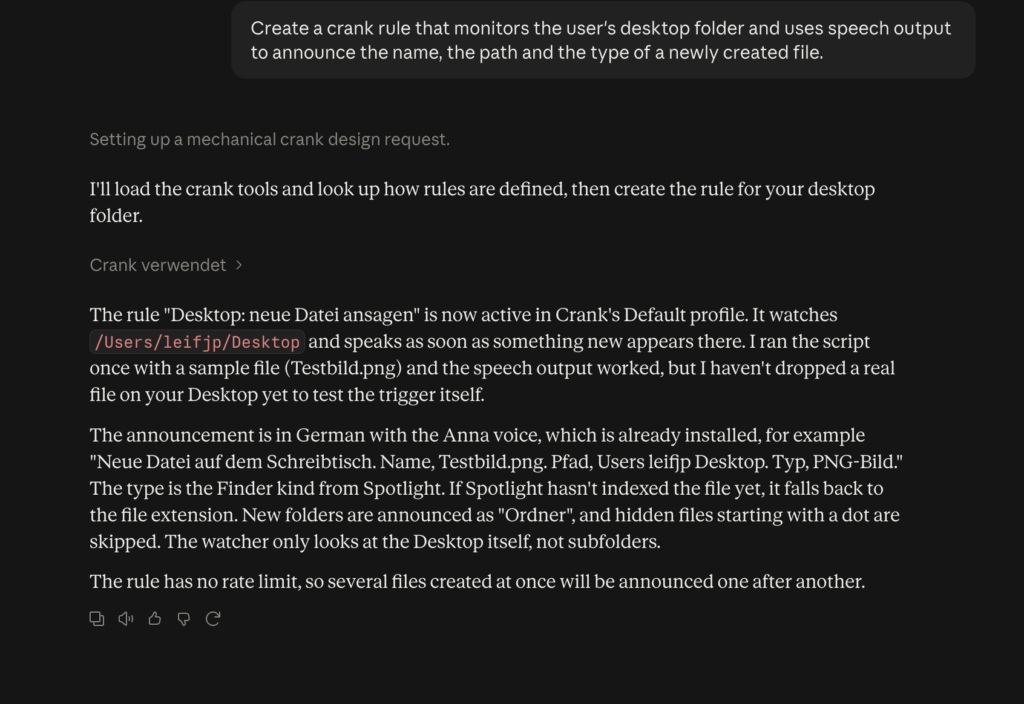
At the end, the finished rule is created directly in Crank, here with the name “Desktop: neue Datei ansagen” (“Desktop: announce new file”).
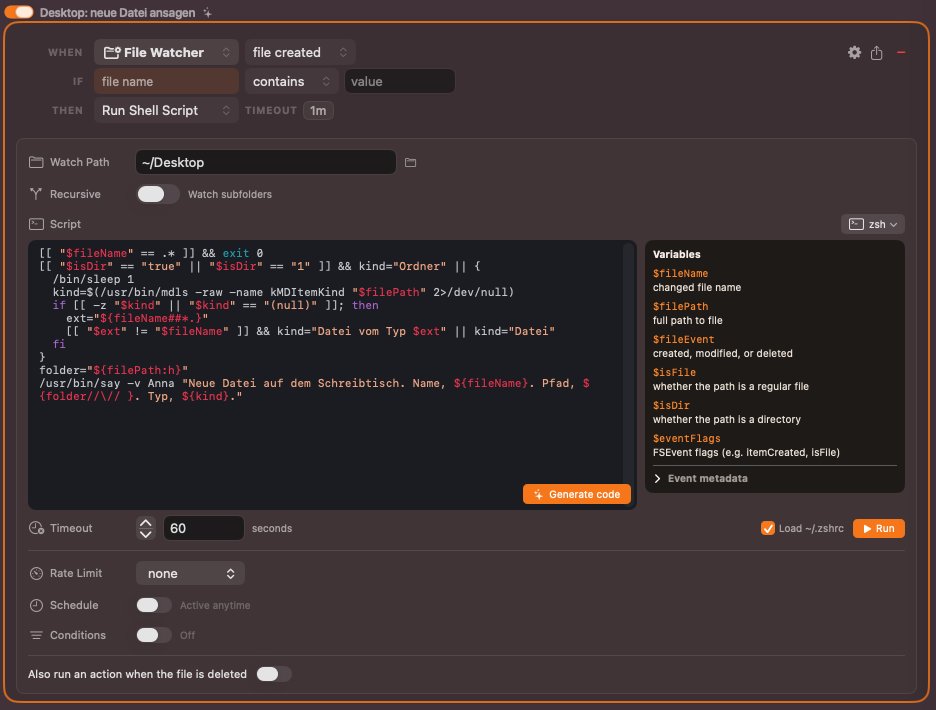
This way, even someone who does not know the syntax of a scripting language can have more complex scripts created. Still, you should have some programming experience, so that you can at least roughly understand what the script does.
Custom Triggers with Scripts
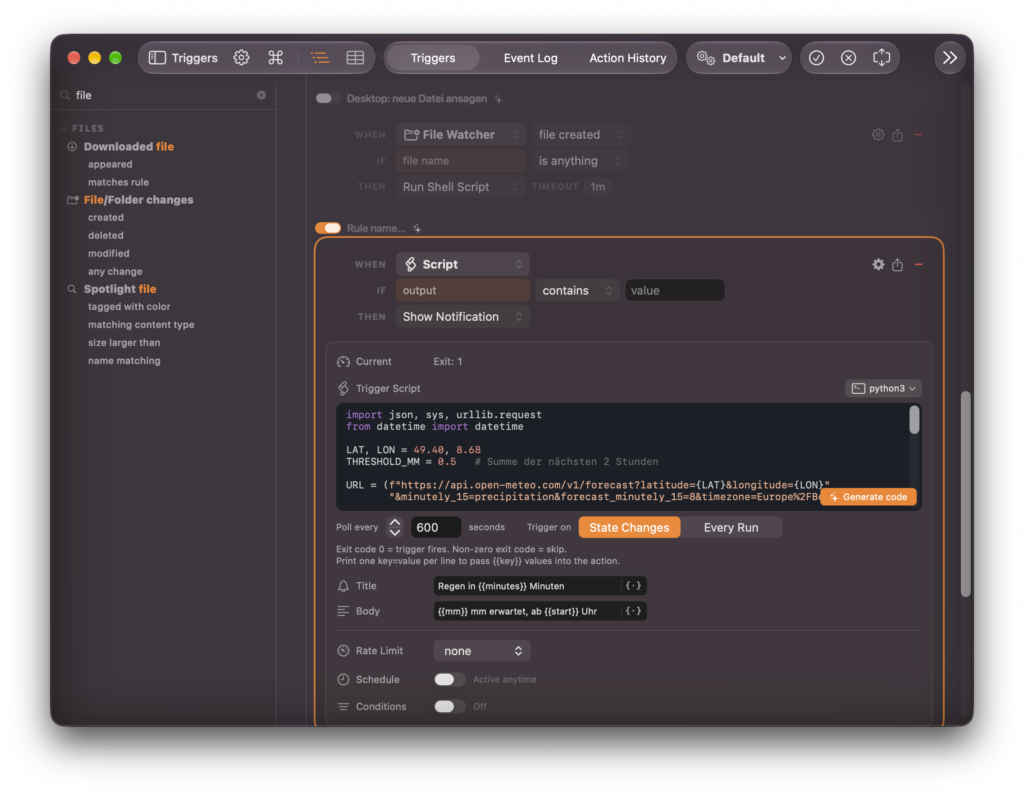
If the existing triggers are not enough, Crank lets you write your own trigger. Instead of watching for a system event, Crank runs a script at regular intervals and uses the exit code to decide whether the rule fires. As an example, I had Claude, as an AI agent, build a rain warning. The script checks the rain forecast for the next two hours for a defined location. If rain is expected, a notification shows when the rain starts and how much to expect. The script looks like this:
import json, sys, urllib.request
from datetime import datetime

# Coordinates for Heidelberg
LAT, LON = 49.40, 8.68
THRESHOLD_MM = 0.5   # Total for the next 2 hours

URL = (f"https://api.open-meteo.com/v1/forecast?latitude={LAT}&longitude={LON}"
       "&minutely_15=precipitation&forecast_minutely_15=8&timezone=Europe%2FBerlin")

# 1 Fetch data, abort silently on any error
try:
    with urllib.request.urlopen(URL, timeout=5) as r:
        data = json.load(r)
    times = data["minutely_15"]["time"]
    rain = data["minutely_15"]["precipitation"]
except Exception:
    sys.exit(1)

# 2 Decide, exit 1 means do nothing
total = sum(x or 0 for x in rain)
if total < THRESHOLD_MM:
    sys.exit(1)

# 3 Determine the start of the rain and the waiting time
first = next((t for t, x in zip(times, rain) if (x or 0) > 0), times[0])
minutes = max(0, int((datetime.fromisoformat(first) - datetime.now()).total_seconds() // 60))

# 4 Output data for the action
print(f"mm={total:.1f}")
print(f"start={first[11:16]}")
print(f"minutes={minutes}")
You enter the script in the “Script” trigger. Crank runs it every 600 seconds (“Poll every”). If it ends with exit code 0, the trigger fires. With any other exit code, the rule is skipped. Lines in the format key=value that the script prints are available to the action as placeholders {{key}}.
What Does the Script Do?
In the header, the required libraries are loaded and variables are defined, namely the geographic coordinates (here Heidelberg) and the threshold from which rain is reported.
The variable URL contains the address of the weather service Open-Meteo, which is used to get the rain amounts for the next two hours. The parameter minutely_15=precipitation defines that the amount of precipitation should be requested, and forecast_minutely_15=8 asks for eight values at 15-minute intervals, which is two hours.
import json, sys, urllib.request
from datetime import datetime

# Coordinates for Heidelberg
LAT, LON = 49.40, 8.68
THRESHOLD_MM = 0.5   # Total for the next 2 hours

URL = (f"https://api.open-meteo.com/v1/forecast?latitude={LAT}&longitude={LON}"
       "&minutely_15=precipitation&forecast_minutely_15=8&timezone=Europe%2FBerlin")
Next, the weather data is requested through the URL. The response from Open-Meteo is a JSON with the forecast data for the next two hours in 15-minute steps. From it, the times are stored in the list times and the amounts of precipitation in the list rain. Entries at the same position belong together. If the request fails, for example because the service is not reachable or does not answer within five seconds, the script ends with exit code 1.
# 1 Fetch data, abort silently on any error
try:
    with urllib.request.urlopen(URL, timeout=5) as r:
        data = json.load(r)
    times = data["minutely_15"]["time"]
    rain = data["minutely_15"]["precipitation"]
except Exception:
    sys.exit(1)
After that, the script calculates whether at least 0.5 mm of rain falls in the next two hours. To do this, all values of the list rain are added up and stored in the variable total. If total does not reach the threshold, the script again ends with exit code 1, and the rule does not fire.
# 2 Decide, exit 1 means do nothing
total = sum(x or 0 for x in rain)
if total < THRESHOLD_MM:
    sys.exit(1)
Next, the script finds the first point in time within the two hours at which, according to the forecast, rain starts. For this, the function zip(times, rain) combines the values from both lists “position by position” into pairs, each with one time and the matching precipitation value. next(...) takes the first point in time at which the precipitation value is greater than zero and stores it in first. Then the script calculates how many minutes remain until that time. If it is already in the past, the waiting time is set to zero.
# 3 Determine the start of the rain and the waiting time
first = next((t for t, x in zip(times, rain) if (x or 0) > 0), times[0])
minutes = max(0, int((datetime.fromisoformat(first) - datetime.now()).total_seconds() // 60))
In the last step, the script prints the values for the notification as key-value pairs, so that the “Show Notification” action can use them.
# 4 Output data for the action
print(f"mm={total:.1f}")
print(f"start={first[11:16]}")
print(f"minutes={minutes}")
You can use these values as placeholders in the “Title” and “Body” fields of the notification, here {{minutes}}, {{mm}}, and {{start}}.

As soon as rain is forecast, a notification like this appears (here in german).

If the rain continues, the “Trigger on” switch matters.

If the switch is set to “State Changes”, you only get a notification when rain is forecast within the next two hours for the first time. Every further run still ends with exit code 0, but does not lead to a new notification. Only when the forecast no longer contains any significant rain, or the service is not reachable, does the script end with exit code 1 again. This resets an internal flag, and at the next run with code 0, a notification appears again.
If the switch is set to “Every Run”, a new notification with updated data appears at every run, which means every ten minutes, as long as rain is forecast. Only when no more rain is expected do the notifications stop. In both cases, this only applies if at least 0.5 mm of rain is forecast.
This is a simple solution that only warns you that it will rain at some point in the next two hours. It does not tell you when the rain stops again. Adding that would go beyond the scope of this article.
In summary, with a script trigger you can define your own events, for example to check sensors that the system’s built-in triggers do not cover, or to connect any external service.
Sharing Rules
You can share rules with other Crank users. To do this, click the share icon, which is typical for macOS, at the top right of the rule box. This copies a link to the clipboard that looks roughly like this (here the rain warning as an example):
https://crank.lowtechguys.com/rule/YnZ4bvEEAACvAwAA4Ah7IjMiOiJub3RpZmljYXRpb24iLCIxMDQAFeADXC91c3JcL2JpblwvcHl0aG9uMwAcQBp2QAgxgAk0MeALe3ttbX19IG1tIGVyd2FydGV0LCBhYiB7e3N0AA4AGsAsVWhyQCsy73NjcmlwdFRyaWdnZXJlZAhCRjDoUmVnZW4gaW4ANOdtaW51dGVzADZQCk0Iikg7NuAZaW1wb3J0IGpzb24sIHN5cywgdXJsbGliLnJlcXVlc3RcbmZyb20gZGEAgORpbWUgIDAoEOAYXG5cbkxBVCwgTE9OID0gNDkuNDAsIDguNjhcblRIUkVTSE9MRF9NTQAc6zAuNSAgICMgU3VtAEjqZGVyIG7DpGNocwCN6iAyIFN0dW5kZW4IUMAvVVJM4CAoZlwiaHR0cHM6XC9cL2FwaS5vcGVuLW1ldGVvLmNvbVwvdjFcL2ZvcmVjYXN0P2wBYOZ0dWRlPXsAj-Z9JmxvbmcoEOhPTn1cIlxuIBgByQ1cIiby52x5XzE1PXAAQORpcGl0EZ9oTyZoI1_0iOo4Juh6b25lPUV1cgCG5yUyRkJlcmwBvIixIinmIyAxIERhCMjkaG9sZQFI7mJlaSBqZWRlbSBGZWhsAOrlc3RpbGwBvkBfYkjmaOR0cnk6GJPkd2l0aDl09UAPLgjtQQooiH0sIOxvdXQ9NSkgYXMgcjowygmFybxhID3x6C5sb2FkKHIpGB0IM8ghcyA98cjNW1wi98ARXCJdEbqYLSJd5HJhaW44LPABOSHzEDXoZXhjZXB0IEUQBwAVIJICPecuZXhpdCgxIRXmMiBFbnRzAPCJFWlkQBxFASlBGGIAYut0IG5pY2h0cyB0dQkP5G90YWwAhetzdW0oeCBvciAwIAGLir0geAigAFLIJmlmIPKaWTwg9jh9_ugzIEJlZ2lubgJpkwlzIIJicyCLSiBXgIt6ZUFqYsmOaW1t5WZpcnN0AH8A2-R0KCh0EHyYf3Qs5HppcCgRUFiKLECJICCkwAUpID4ZouRzWzBdAHsZPwl85G1heCgDC4BSaW4rLktMLsBgaXNv5G1hdCgQd8tOKSAt9egubm93KCkpLhDp619zZWNvbmRzKCkgCwLkIDYwKSDcYm4062bDvHIgZGllIEFrCYjnIGF1c2dlYgjRiHhwcgNC5G1tPXsQTuU6LjFmfRKwMBwUSJCGPXvnWzExOjE2XTgi9SDObD898QAfDDlGM-U2MDAuMAzQNIDiIn0GAAAAAAAAAGJ2eCQ
The rule is not stored on a server. It is completely contained in the link, compressed and Base64-encoded, but not encrypted. Anyone who has the link can therefore read its content. The server seems to act only as a bridge. It replaces the part https://crank.lowtechguys.com/ with crank://, so that when you open the link, the rule appears right away in an import window in Crank.
Before you import a rule, you should always check what it does. A shared rule can run shell scripts on your computer. Depending on your security settings, this may even happen without a prompt. Everything that is in a rule is also in the link, such as paths, locations, or credentials. You should keep this in mind before you share a rule.
If you want to bypass the server, you can also edit the link yourself and replace https://crank.lowtechguys.com/ with crank://. If you enter this address in a browser, the rule is imported in the same way.
I do not know why the developers chose this approach instead of simply saving the rule as a file that you could then share.
Conclusion
Crank joins a series of tools that help automate certain workflows. Its strengths are the simple implementation of the trigger → condition → action approach, the large number of triggers, and the supported scripting languages. For simple actions, you can use Apple Shortcuts. zsh is suited for existing command-line tools, Python for web services and JSON processing, and a Swift script is a good choice for actions that need access to macOS frameworks. If you prefer another language, you can even add your own interpreter.
There are also some points of criticism.
- Switches are often far away from what they control. The switch “Also run an action when the file is deleted” is at the bottom of the rule, but the related action appears in the upper part.
- Conditions are spread over several places: the IF line, the “Watch Path”, and the “Conditions” switch.
- You cannot freely reorder rules in the list. Groups provide some order, but more freedom in sorting would be helpful.
Profiles are a practical way to put together rules for different work contexts. It is only a pity that you can move rules between profiles with the context menu, but not copy them.
For simple uses, the app is reasonably intuitive. But there are also more complex concepts that you cannot understand just by looking at them, such as “State Changes” versus “Every Run” or “Throttle” versus “Debounce”. More documentation would help here, even though the slogan says “no manual required”.
If you are looking for a simple way to run scripts depending on system events or on a schedule, you can get to your goal very quickly with Crank. However, you need a minimum of programming knowledge. Even if you only use ready-made rules from the internet or an AI to create them, you should have enough knowledge to at least roughly understand what the script does.


Leave a Reply