For bookmarking websites during my information research, I increasingly move from tools like Instapaper and Omnivore to Obsidian as the place to save and organize my bookmarks.
In this article, I want to show a few solutions using Apple Shortcut together with the Shortcut extension “Actions for Obsidian” from Carlo Zottman. These range from a simple one-line bookmarks to slightly more complex methods that also save a selection from within a browser window. Let’s start with the simple one.
1. Simple Bookmark
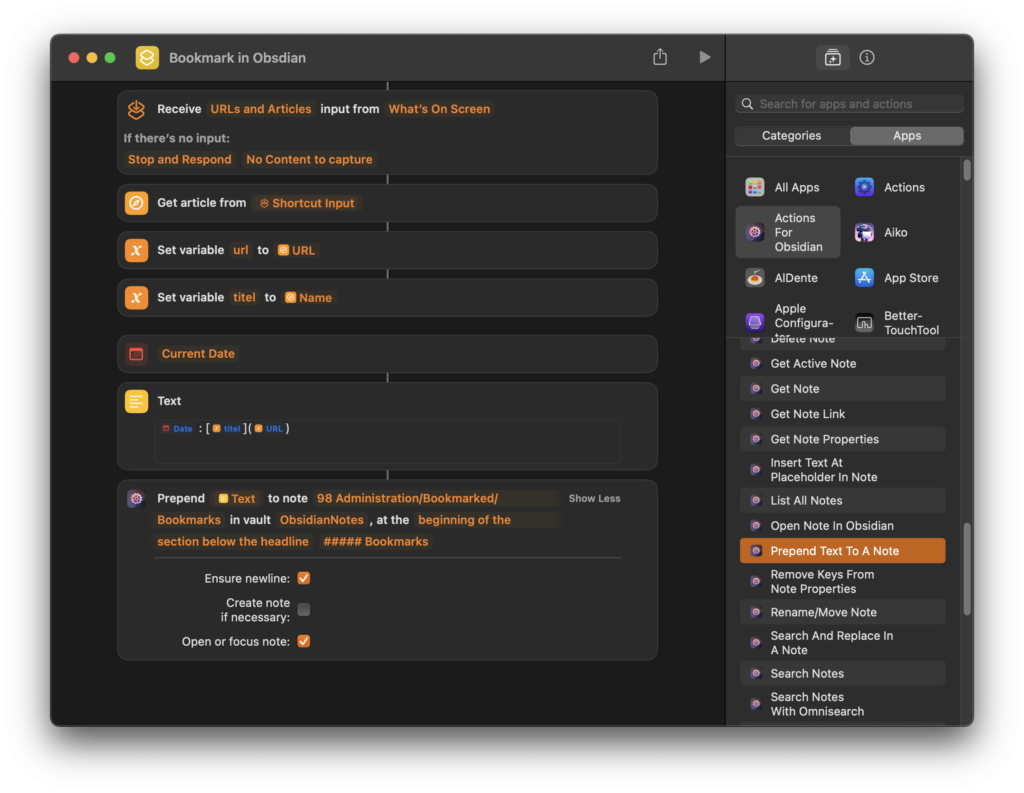
The first shortcut just adds a line which consist only of the creation date and the clickable title plus a empty line at the top of a dedicated Obsidian note, in my case “98 Administration/Bookmarked/Bookmarks”.

The shortcut workflow includes several actions:
- Receive URLs and Articles input from “What’s On Screen”.
- If no content is found, the shortcut will Stop and Respond with “No Content to capture”.
- Get Article from Shortcut Input: It captures an article from the provided input.
- Set variable url to URL: This action assigns the URL of the article in the variable url.
- Set variable title to Name: This stores the article’s name in the variable title.
- Current Date: Captures the current date.
- Text: Constructs a text string that includes the date, title, and URL.
- Prepend Text to note: Adds this constructed text to a specific note titled “98 Administration/Bookmarked/Bookmarks” in the “ObsidianNotes” vault after the headline “#### Bookmarks”, ensuring it starts on a new line and focuses on the Bookmarks at the end, which makes Obsidian active. This last action is part of the “Actions for Obsidian” extension, which integrates seamlessly with the shortcut to activate Obsidian.
The Bookmarks file needs to have the headline “#### Bookmarks” as a marker, so the actions find the place to include the bookmark just captured. You can use any headline and size you prefer. Ideally, I would prefer an invisible marker, which is achievable in Markdown using syntax like %%text%%; however, the “Actions for Obsidian” extension supports only headlines for this purpose.
2. Bookmark with Preview Image and Excerpt
In a lot of case, the first bookmarking style might be enough, but I also love to have some more context about the web pages, that I had bookmarked later on. Therefore, I developed a second style that captures both an image and the excerpt. This approach is particularly useful for visual referencing and quick content review, enabling me to recall the essence of the web page without needing to revisit it immediately.
To achieve such a layout, the use of a table is obvious. Unfortunately, Markdown does not offer the possibility to create the required structure at this point. Fortunately, you can also simply use an HTMl table directly. With one restriction, which I will explain below.
Next code shows the HTML-Template:
<table style="border: none; border-collapse: collapse;">
    <tr>
        <td style="font-size: 1.2em; font-weight: bold; padding-left: 10px; padding-right: 10px;">
            [DATUM]
        </td>
        <td>
            <a href="URL">
                "[TITLE]"
            </a>
        </td>
    </tr>
    <tr>
        <td>
            <img src="[IMG]"
                 width="200px"
                 style="padding: 10px;">
        </td>
        <td style="padding-right: 10px;">
            <p>
                [EXCERPT]
            </p>
        </td>
    </tr>
</table>
It would also be possible to add a background color, but this would have side effects when using the dark mode.

The workflow for this shortcut is as follows:
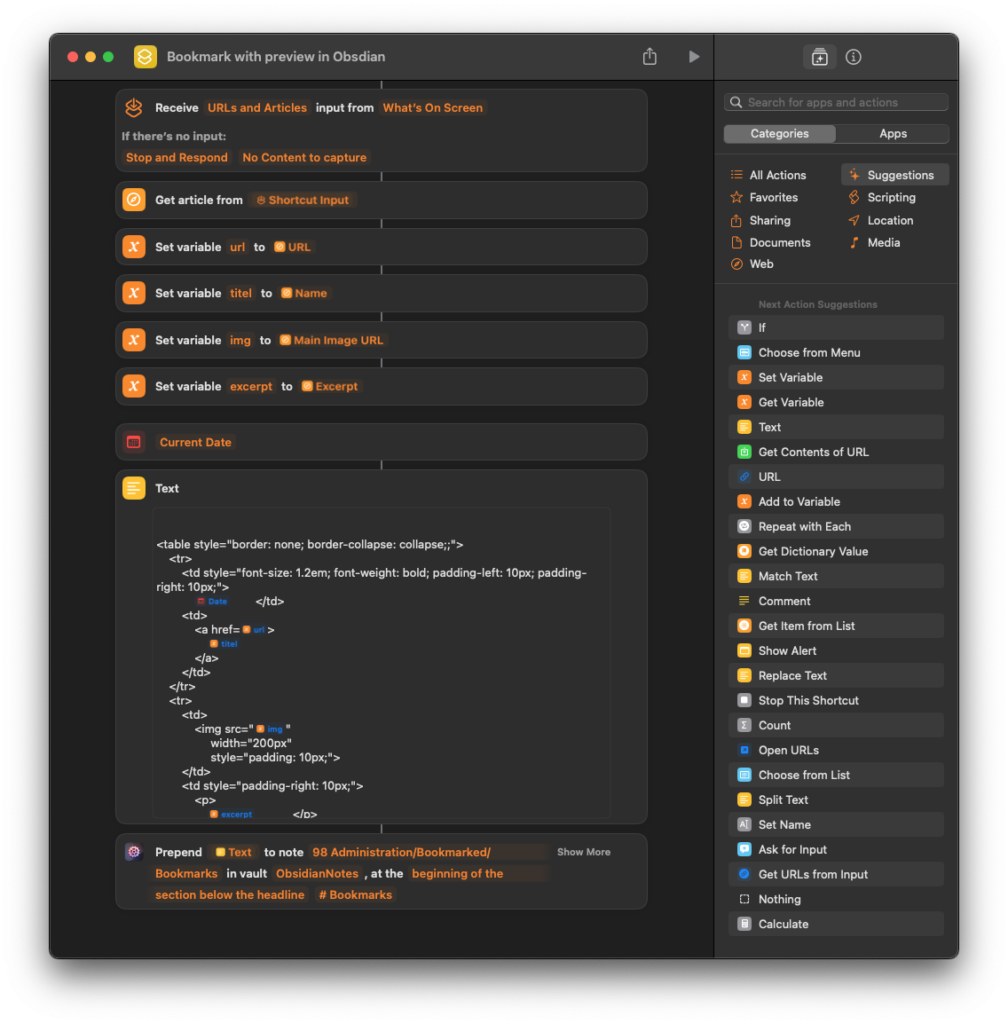
- Receive URLs and Articles from “What’s On Screen”. If nothing is found, the shortcut will Stop and Respond with “No Content to capture”.
- Get article from Shortcut Input: Retrieves an article from the input provided.
- Set variable url to URL: Stores the URL of the article.
- Set variable title to Name: Stores the title of the article.
- Set variable img to Main Image URL: Stores the main image URL of the article.
- Set variable excerpt to Excerpt: Stores a text excerpt from the article.
- Current Date: Retrieves the current date.
- Text: Creates an HTML snippet that formats the date, title, URL, image, and excerpt into a table layout for insertion into Obsidian.
- Uses the same call of the action “Prepend text to note as above”
I have been using this approach for several months, initially not as an Apple Shortcut, but as an Alfred Workflow with Python scripting. This method provides better coverage for the preview image and excerpt than the Shortcut’s “Article” object. However, using Python in a shortcut on iOS/iPadOS is not so easy, therefore this method is beneficial as it works across all Apple platforms.
The restriction I mentioned above is something I didn’t recognize until I wrote this article and tested the scripts again. There is a difference in how HTML tables are rendered, depending on the modes and themes that are used. I always work in the “Editing View” combined with “Live Preview,” so I hadn’t mentioned it before. The results appear as expected in the Standard Theme when using “Editing View” with the “Live Preview” setting:

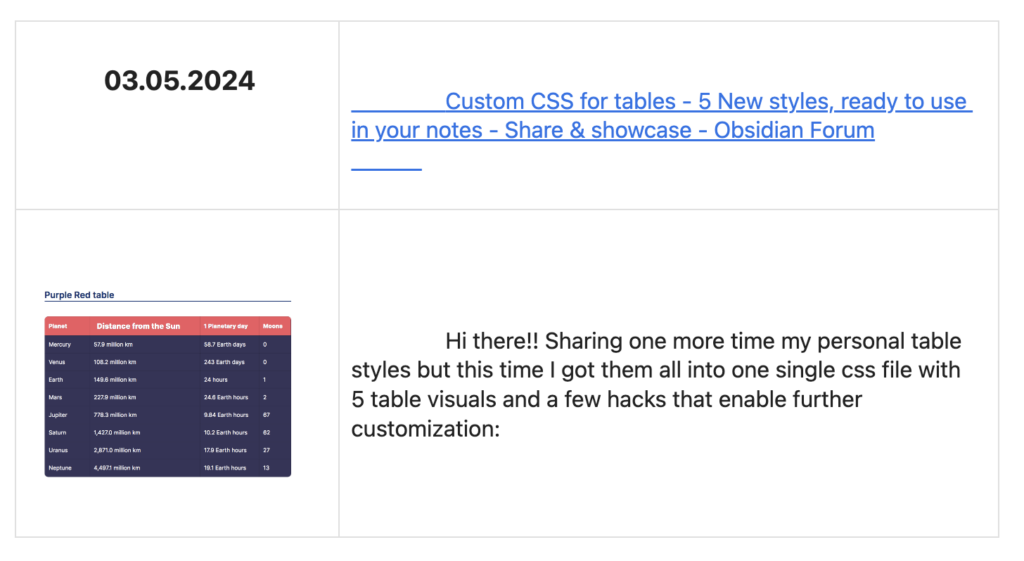
But, when switching to the “Reading View,” the rendering becomes totally different.

So far, I haven’t been able to find the right solution to solve this issue. I’ve tried hard and did a lot of research but without a convincing result. If anyone has a tip, I’d really appreciate it. The rendering looks a bit better when using the “Minimal” theme, which shows that different themes can affect how tables in HTML appear. Check how this solution works with your mode and theme. settings. I also looked at the examples from the link shown in the picture; they weren’t very helpful in this case, but the article is still worth reading: Custom CSS for tables — 5 New styles, ready to use in your notes
3. Capture a Selection with the bookmark
The third solution currently works only in Safari because there is no way to run JavaScript from a shortcut in any other browser. However, I had the opportunity to test a very early version of another promising shortcut extension from Carlo Zottmann called Browser Action which will eventually enable JavaScript execution in almost every browser on a Mac. Thus, in the future, this solution can be easily extended to all browsers. I also implemented a version with the Alfred app that supports all browsers and I discussed this solution on my German-speaking blog, titled “Eine Textauswahl im Browser in Obsidian speichern”. I haven’t translated it yet, so if you are interested, please use a translation app.
To capture a section in a browser window the natural method is to use JavaScript. Because I’m not a JavaScript expert I created that part with the Help of ChatGPT.I explain the script extensively in my German article about the Alfred app solution. Here, I will only present the essential parts of the scripts and the shortcut itself.
This is the JavaScript code:
/**
* Extracts the currently selected HTML from the browser window.
* @returns {string} The HTML string of the selected content.
*/
function getSelectionHtml() {
let html = "";
if (window.getSelection) {
const sel = window.getSelection();
if (sel.rangeCount) {
const container = document.createElement("div");
for (let i = 0, len = sel.rangeCount; i < len; ++i) {
container.appendChild(sel.getRangeAt(i).cloneContents());
}
html = container.innerHTML;
} else {
}
} else {
}
return html;
}
/**
* Converts HTML content into Markdown.
* @param {string} html - HTML content to be converted.
* @returns {string} The converted Markdown.
*/
function convertHtmlToMarkdown(html) {
const doc = new DOMParser().parseFromString(html, 'text/html');
let markdown = convertNode(doc.body);
return markdown.trim();
}
/**
* Converts an HTML node to its Markdown representation.
* @param {Node} node - The HTML node to convert.
* @returns {string} Markdown representation of the node.
*/
function convertNode(node) {
let markdown = '';
if (node.nodeType === Node.ELEMENT_NODE) {
switch (node.tagName) {
case 'H1': case 'H2': case 'H3': case 'H4': case 'H5': case 'H6':
markdown += `${'#'.repeat(parseInt(node.tagName[1]))} ${node.textContent.trim()}\n\n`;
break;
case 'P':
markdown += `${node.textContent.trim()}\n\n`;
break;
case 'A':
markdown += `[${node.textContent}](${node.href})`;
break;
case 'UL': case 'OL':
markdown += convertList(node);
break;
case 'IMG':
const alt = node.alt || 'Image';
const src = node.src || '';
const title = node.title ? ` "${node.title}"` : '';
markdown += `\n`;
break;
case 'PRE': case 'CODE':
markdown += `\`\`\`\n${node.textContent}\n\`\`\`\n\n`;
break;
case 'TABLE':
markdown += convertTableToMarkdown(node);
break;
default:
node.childNodes.forEach(child => {
markdown += convertNode(child);
});
break;
}
} else if (node.nodeType === Node.TEXT_NODE && node.textContent.trim()) {
markdown += node.textContent.trim() + ' ';
}
return markdown;
}
/**
* Converts HTML lists to Markdown.
* @param {HTMLElement} list - The list element.
* @returns {string} Markdown formatted list.
*/
function convertList(list) {
let markdown = '';
const items = list.children;
for (let item of items) {
if (item.tagName === 'LI') {
const prefix = list.tagName === 'OL' ? (Array.from(list.children).indexOf(item) + 1) + '.' : '-';
markdown += `${prefix} ${item.textContent.trim()}\n`;
}
}
return markdown + '\n';
}
/**
* Converts HTML tables to Markdown.
* @param {HTMLTableElement} table - The table element.
* @returns {string} Markdown formatted table.
*/
function convertTableToMarkdown(table) {
let markdown = '';
const rows = table.querySelectorAll('tr');
rows.forEach((row, index) => {
let rowMarkdown = '|';
row.querySelectorAll('th, td').forEach(cell => {
rowMarkdown += ` ${cell.textContent.trim()} |`;
});
markdown += rowMarkdown + '\n';
// Add header separator for the first row if it contains headers
if (index === 0 && row.querySelector('th')) {
markdown += '|' + Array.from(row.children).map(() => ' --- ').join('|') + '|\n';
}
});
return markdown + '\n';
}
/**
* Main function that orchestrates the conversion from HTML to Markdown.
* @returns {void}
*/
function main() {
const html = getSelectionHtml();
if (!html) {
return;
}
let markdown = convertHtmlToMarkdown(html);
const datum = new Date().toLocaleDateString();
const title = document.title;
const url = window.location.href;
const header = `\n\n>[\!snippets] ${datum} [${title}](${url})\n`;
markdown = markdown.split('\n').map(line => '> ' + line).join('\n');
markdown = header + markdown;
return (markdown);
}
completion(main());This script fetches the selection from the browser and processes the HTML tags to convert them into the corresponding Markdown. The script converts only the following HTML tags, and from what I see, it does so almost without errors:
<H1>bis<H6><p><a><img><pre>und<code><ul>und<ol><table>
The JavaScript also creates the Markdown that I will use for my special Obsidian note for these snippets:
>[\!snippets] 02.02.24: [example website](https://example.com)
> This is the first line of the selection
> A second line
The result on the page looks like this:

I use a self-defined callout [!snippets]. If you are not familiar with this, you can opt for one of the predefined callouts, such as [!info]. Nevertheless, regardless of which snippet type you use, the backslash \ before the ! in the code is necessary because using ! alone without the escape symbol produced errors. The two \n\n in the code before [\!snippets] serve to visually separate the blocks in the Obsidian note.

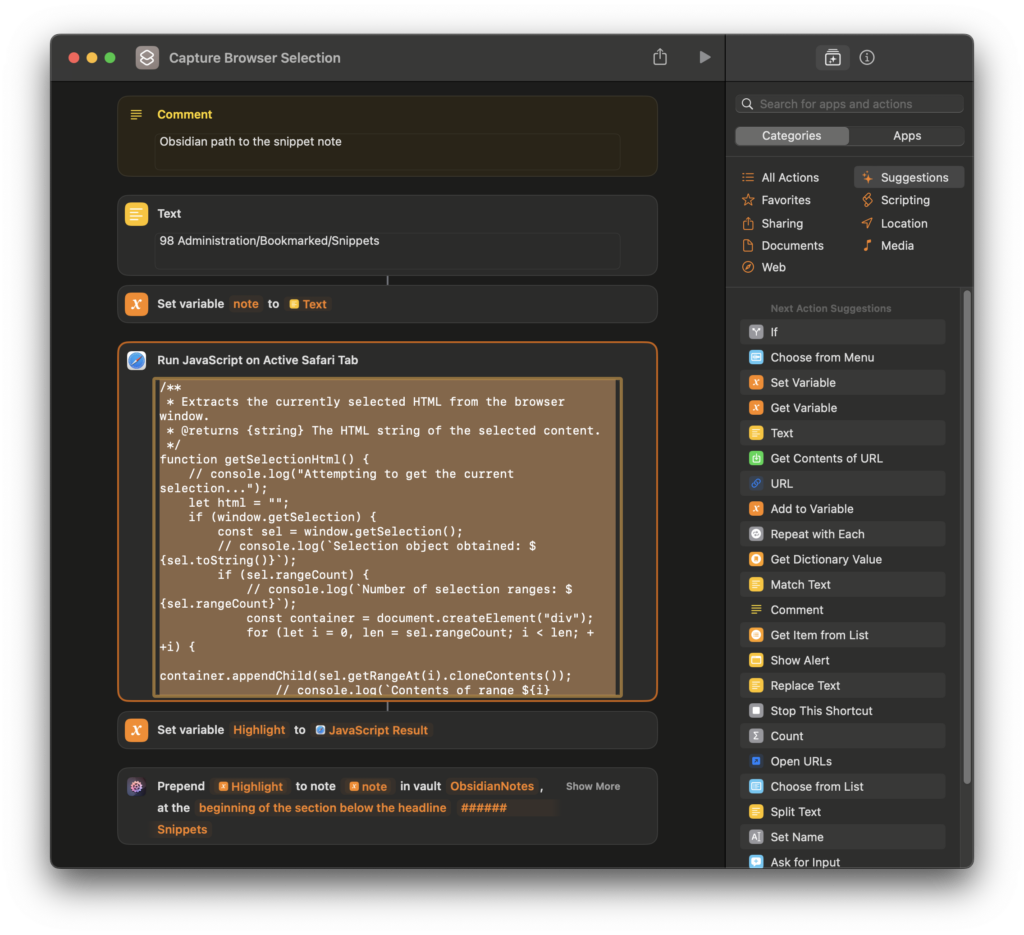
- Comment:Just an explanation that the next action sets the Obsidian path to the snippet note.
- Text: Inputs the text “98 Administration/Bookmarked/Snippets” to specify the note where the snippet will be included.
- Set variable note to path of the note: Assigns the previously specified path to a variable named “note”. This can also be done direct in the prepend call, I use it here just for transparency.
- Run JavaScript on Active Safari Tab: Executes a JavaScript snippet in the active Safari tab to capture the HTML of the selected text. The script checks if there is a selection and logs details about it, including cloning the contents to ensure it captures a standalone copy.
- Set variable Highlight to JavaScript Result: Saves the result of the JavaScript execution to a variable named “Highlight”.
- Prepend Highlight to note: Adds the captured HTML as markdown content to the specified Obsidian note at the beginning of the section under the headline “###### Snippets”.
That’s all
I captured the example screenshots using the Shortcut app on my Mac. However, it’s important to note that these shortcuts works seamlessly on iPhone and iPads as well. They may work on the Apple Vision as well, but until Tim Cook sends me a test device, that will remain unconfirmed!


Leave a Reply