

Over the past few years, I have used various Read-It-Later apps to save links to websites or articles that interested me. Since such a collection should ideally be maintained and accessed from different devices, web services seemed like a good solution at first. Unfortunately, they have the disadvantage that they are often bought up at some point and then usually discontinued. This is what happened to me, for example, with Delicious (2019), Omnivore (2024) and currently with Pocket.
So I moved from these services to solutions I hosted myself, like Bookmarks for Nextcloud. For some time now, I have used an Apple Shortcut and Obsidian as an independent solution. In this blog, I already presented Three Styles to Save Bookmarks in Obsidian. Now, I use an updated version. This version is fully in line with the Obsidian philosophy. The bookmarks are now saved locally as simple Markdown files. This means that they remain completely in your own ownership, can be read and edited by other apps, and remain accessible even if Obsidian itself is no longer developed.
What a Read-It-Later Solution Should Do
Traditionally, the requirements for a read-it-later app are:
- easy access in the web browser
- content organization
- visual orientation
- good readability
- synchronization across the devices used
Because I use Apple Shortcuts, there are different ways to start the tool. I use the share sheet option on the iPhone and iPad, but this is too complicated to use on the Mac. That’s why I initially used the “Pin in Menu Bar” option, but I now use the Barcuts app from the indie developer Carlo Zottmann, which I have described here.
I wanted to keep creating bookmarks simple. The URL is just processed and, as you can see in the two examples, stored either without or with a preview image:
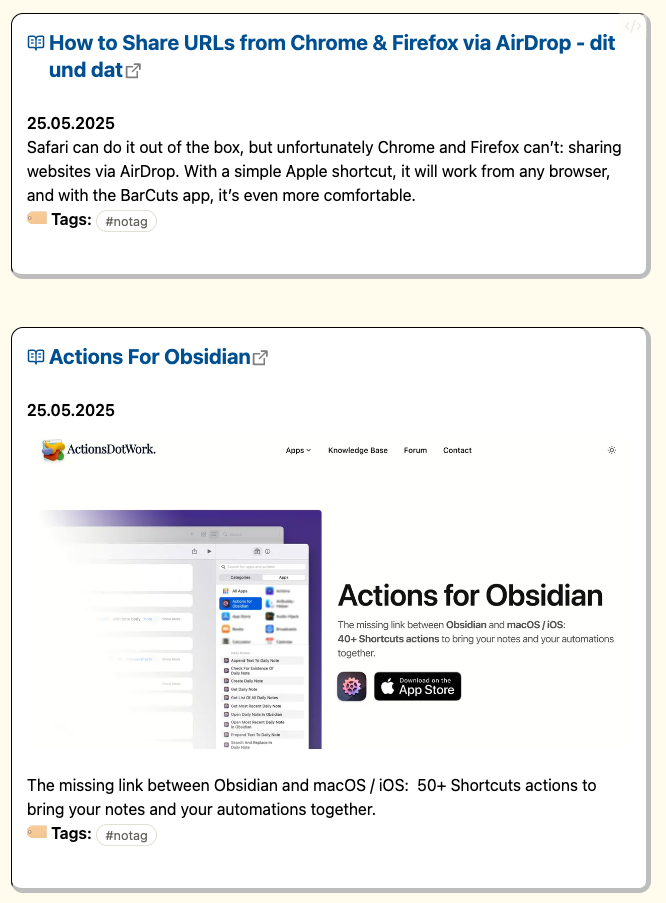
Whether a preview image is displayed depends on whether the shortcut finds one. This does not seem to be the case with my WordPress pages. Most of the time, however, an image like in the second example is displayed (@Carlo, I hope I was allowed to use the URL as an example).
I organize the content when I read it later. I edit the collected bookmarks daily: articles are either processed directly, summarized in new or integrated into existing notes and deleted from the list. Sometimes I leave them in the bookmark for further processing, but add tags that help categorize them by topic, importance, or both, so I can easily find them using the search function.
Implementation
My solution consists of 3 parts:
- An Apple Shortcut that processes the web page and creates a Markdown Callout for the bookmark note.
- Carlo Zottmann’s app Actions for Obsidian, which writes the callout into the bookmark note.
- A CSS snippet in my Obsidian Vault that defines the design of the bookmark.
The Shortcut
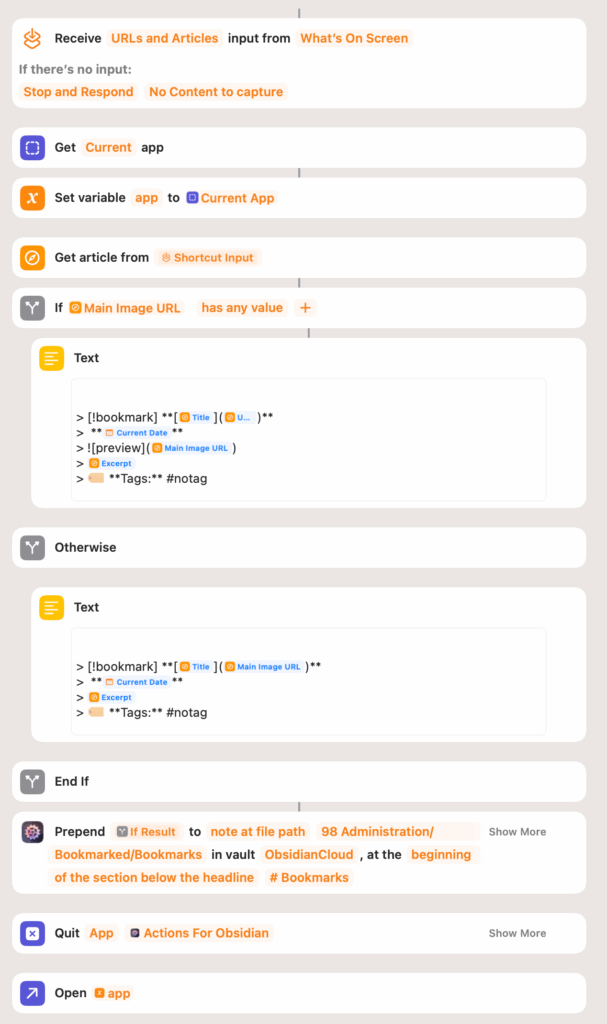
The shortcut performs the following steps:
- Activate the options “Receive What’s On Screen” and, if needed, “Pin to menu bar” in the shortcut details.
- Select only “URLs” and “Article” as input sources in the shortcut editor. I define also a message if the shortcut is not started in a browser.
- Save the currently active app in a variable, so the browser come back to the front at the end.
- Create the “Article object” with the data from the active website for later processing.
- Use an “if” statement to check if a “Main Image URL” is available:
- If yes, create the markdown for the bookmark callout including a preview image from the article data and store it in the variable
Text. - If not, create the markdown without a preview image.
- If yes, create the markdown for the bookmark callout including a preview image from the article data and store it in the variable
- Insert the created callout in the variable
Textinto the bookmark note using the “Actions for Obsidian” action “Prepend Note” below the heading# Bookmarks. Adjust the Vault and path as needed. - macOS only: Close the “Actions for Obsidian” app so it does not stay visible in the dock or app switcher (⌘ tab). This is not possible on iPadOS/iOS.
- Bring the browser back to the front.
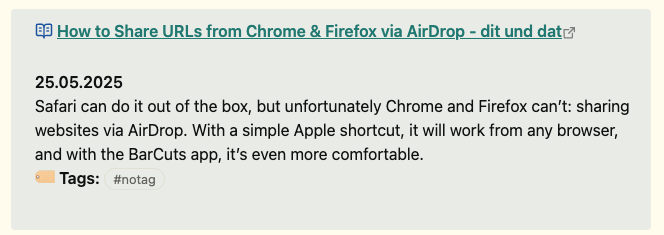
This is how it looks:
That’s it for the shortcut part. Before testing the shortcut, you should create your bookmark note with the headline # Bookmarks. When this is done, start your browser, visit a webpage, and run the shortcut. You can use any browser—at least Safari, Chrome (and Chrome-based), and Firefox should work.
Because there is no [!bookmark] callout by default, the bookmark is shown like this at first:
To customize the appearance, you need to define a CSS snippet.
The CSS snippet
I use a CSS snippet to define the appearance. If you are not familiar with this concept, here is a short introduction:
Obsidian allows you to customize the appearance either with themes, which change the whole interface, or with CSS snippets, which only change specific parts. CSS snippets must be stored in a special folder. You can find this folder via Settings → Appearance → CSS snippets by clicking the folder icon in the top right corner, which open this folder in the FInder.

Now, use a text editor that saves plain text—such as Sublime, TextMate, VS Code, or in the terminal with nano, vim, or emacs—to create a CSS file. Name it, for example, bookmark.css, and add the following content. Save it in the folder you opened before.
/* Callout for Bookmarks */

.callout[data-callout="bookmark"] {
    --callout-color: white;
    --callout-icon: book-open-text;

    background: white !important;
    border: 1px solid black;
    border-right: 5px solid #6666 !important;
    border-bottom: 5px solid #6666 !important;
    border-radius: 12px;
    padding: 15px;
}

.callout[data-callout="bookmark"] .callout-title {
    font-weight: bold;
    color: #005a9c;
    font-size: 1.3em;
}

.callout[data-callout="bookmark"] .callout-title a {
    text-decoration: none !important;
    color: #005a9c;
    font-weight: bold;
}

.callout[data-callout="bookmark"] .callout-title a:hover {
    text-decoration: none !important;
    color: #003366;
}

.callout[data-callout="bookmark"] p {
    color: black !important;
}

.callout[data-callout="bookmark"] img {
    max-width: 100%;
    height: auto;
    border-radius: 12px;
    margin-top: 10px;
    display: block;
}
After you put the CSS file in the correct folder, go back to the Obsidian settings, click the reload icon next to the folder icon, and activate the CSS snippet.

The bookmarks should The bookmarks should now look like the images above. look like the images shown above.
A small but annoying issue occurs when the Obsidian Vault is saved in the iCloud: For reasons that are not entirely clear, the CSS files are not shown in the Finder, but they do appear in the Obsidian settings dialog. Apple has apparently decided that all files in hidden folders in the Finder will not be displayed if they are in iCloud. However, you can use the key combination ⌘-⇧-. to temporarily show these hidden files. Please note: This applies to all folders, and many of these hidden files and folders are important for macOS or for apps to work. You should not change or delete them.
Conclusion
I hope this short article has shown how you can create a replacement for Pocket and similar services with simple tools. This solution makes you independent of external providers and gives you more flexibility, because you can also process the files with other programs or scripts. I still think this is one of the great advantages of Obsidian’s openness.
Leave a Reply