In my article First Steps with “Browser Actions”, I presented examples of how to use Carlo Zottmann’s new app Browser Actions. One example was a shortcut to capture a selection in a browser window and display it in Obsidian as a quote callout.
In my next article Form Base Entry for Obsidian, I discuss how to use an HTML page with a form to capture data for an Obsidian note. This article serves as a concept car to illustrate the idea of combining Apple Shortcuts, HTML form-based data input, and Obsidian in a workflow.
I often use the shortcut to capture selections from webpages. What I always missed is the ability to add tags and my own notes. In this article, I combine the two shortcuts and present a useful solution to capture selections while also adding my own notes and tags.
The flow

With a selection in a browser window, the shortcut must be executed. Since the shortcut is called without any parameters, the “No” path of the conditional statement will be executed.
An action from the Browser Action app then captures all relevant attributes of the active browser window. However, in our context, we are only interested in the following:
- The pageURL
- The pageTitle
- The active selection (formatted as Markdown)
Now, the shortcut uses another action to open a predefined HTML form in a new tab. This form includes fields for the pageURL, pageTitle, and a field for the captured selection in Markdown.
When this page is active, the attributes will be inserted into the corresponding fields by another action from the Browser Action app.
Now the user can:
- Preview the selection
- Review the other data
- Add an extra note and some tags
After clicking the submit button, the snippet will be built, and with help of “Actions for Obsidian,” the snippet will be added to the special page in Obsidian.
The HTML-Form
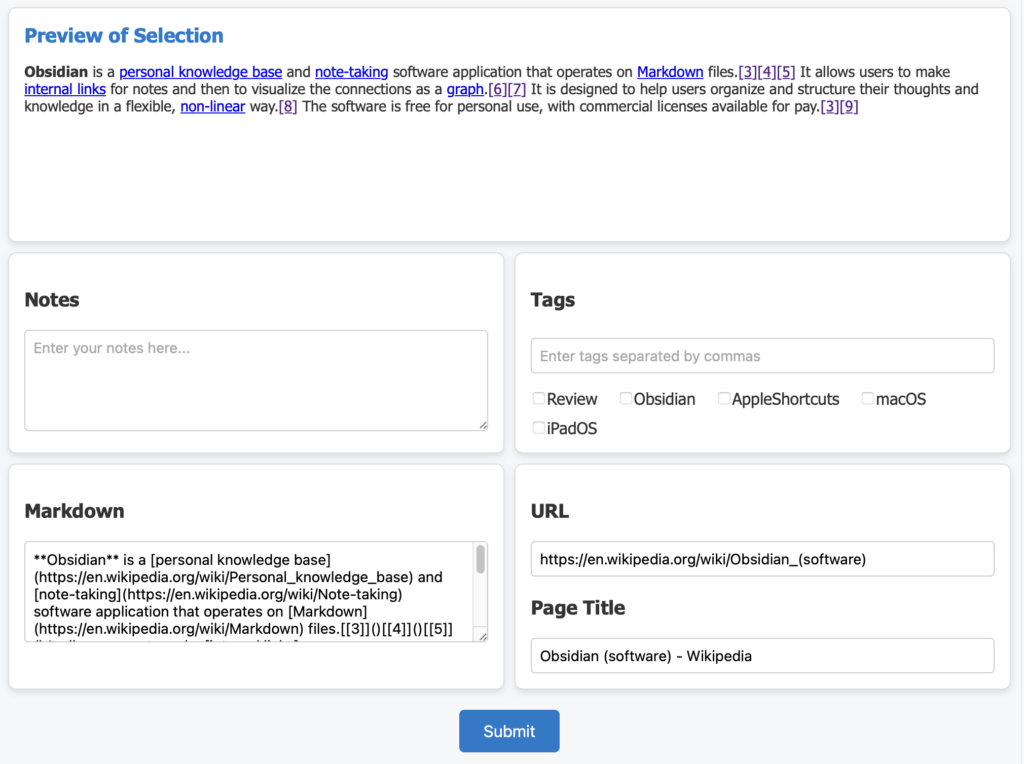
Let’s start with the html form page. On top there is a field, that shows the markdown of the selection as preview.
Below this there is two groups, left for an additional note from the user and right for the tags input. Because most time, I use only a few predefined tags, these are rendered here as checkboxes. Nevertheless for additional tags there is an input field as well.
The note can be multiline, and it’s possible to use any Markdown supported in callouts. Tags can be entered into the input as comma-separated values, without the #. These will be added by the JavaScript.
Next there are the fields for the markdown of the selection and the pageURL and pageTitle. These fields are actually meant only as temporary storage so that they are not lost for the next call of the shortcut. Therefore, I intended to hide them behind a collapsible area or make them completely invisible. However, the current beta version (2024.0.5) seems to have issues with both options. I think this will be fixed soon. Until then, these fields will be visible so that the user can make changes if necessary.
At the very bottom is the submit button. After this button is pressed, the content of all fields is sent back to the shortcut as a JSON string. Since the shortcut is now called with an input, it will then process the other part of the conditional statements to build the snippet and place it on the Obsidian note.

The HTML code is pretty straightforward. In the head section, along with the CSS, there is a script that includes the markedjs/marked library for parsing Markdown.
The HTML code in the body section manages the fields I described earlier, as well as the submit button. As well as the JavaScript part with these two functions:
The updatePreview() function updates the preview whenever the user types in the Markdown textarea. It retrieves the Markdown content and updates the preview box using the Marked.js library to convert Markdown to HTML.
The handleSubmit() function is called when the submit button is clicked. It collects values from the notes, tags, Markdown, URL, and title fields. The function processes the tags input by splitting each entry (separated by a ,), adding a # in front of each tag, and saving them into an array. In addition, the script processes all checked checkboxes, collecting the name of each checkbox and adds a # before name.
All data is combined into an object, which is then converted to a JSON string. Finally, it starts the shortcut using the specific URL scheme (shortcuts://run-shortcut) with the JSON string as input for further processing.
The handleSubmit() function is called when the submit button is clicked. It collects values from the notes, tags, Markdown, URL, and title fields. The function processes the tags input by splitting each entry (separated by a ,), adding a # in front of each tag, and saving them into an array. Additionally, the script handles all the checked checkboxes, collecting the text (i.e., the name of each checkbox) and adding a # in front of each tag as well.
This function facilitates easy modification of checkboxes for tags. Just edit the text, add or delete checkbox inputs.
Here is the whole HTML-file:
<!DOCTYPE html>
<html lang="en">
<head>
    <meta charset="UTF-8">
    <meta name="viewport" content="width=device-width, initial-scale=1.0">
    <title>Create Snippet with note and tags in Obsidian</title>
    <script src="https://cdn.jsdelivr.net/npm/marked/marked.min.js"></script>
    <style>
/* Base Body Style */
body {
    margin: 0;
    padding: 10px;
    font-family: 'Segoe UI', Tahoma, Geneva, Verdana, sans-serif;
    background-color: #f4f7f9;
    color: #333;
}

/* Container Styling */
.container {
    display: grid;
    grid-template-columns: 1fr 1fr;
    gap: 10px;
    max-width: 1000px;
    margin: 0 auto;
}

/* Box Styling */
.box {
    background-color: #fff;
    border-radius: 8px;
    box-shadow: 0 3px 6px rgba(0, 0, 0, 0.1);
    padding: 15px;
    border: 1px solid #ddd;
}

/* Preview Box Styling */
.preview-box {
    grid-column: 1 / 3;
    min-height: 200px;
    font-size: 0.9rem;
    overflow: auto;
}

.preview-box h2 {
    margin-top: 0;
    font-size: 1.2rem;
    color: #007acc;
}

/* Notes and Tags in Two Columns */
.notes-tags-box {
    grid-column: 1 / 3;
    display: grid;
    grid-template-columns: 1fr 1fr;
    gap: 10px;
}
.note-field {

}

/* Tags Section */
.tag-input {
    width: 100%;
    padding: 8px;
    font-size: 0.9rem;
    border-radius: 4px;
    border: 1px solid #ccc;
    margin-top: 8px;
    margin-bottom: 15px; /* Added space below tag input field */
}

/* Checkbox Group - Inline with Wrap */
.checkbox-group {
    display: flex;
    flex-wrap: wrap;
    gap: 10px; /* Space between checkboxes */
}

.checkbox-group label {
    display: flex;
    align-items: center;
    margin-right: 10px;
}

/* Markdown and Meta Information Side by Side */
.markdown-meta-box {
    grid-column: 1 / 3;
    display: grid;
    grid-template-columns: 1fr 1fr;
    gap: 10px;
}

/* Input and Textarea Styling */
textarea, input[type="text"] {
    width: 100%;
    padding: 8px;
    font-size: 0.9rem;
    border-radius: 4px;
    border: 1px solid #ccc;
    box-sizing: border-box;
}

textarea {
    min-height: 100px;
    resize: vertical;
}

/* Submit Button Styling */
.submit-button {
    display: block;
    margin: 20px auto;
    padding: 12px 24px;
    font-size: 1rem;
    background-color: #007acc;
    color: white;
    border: none;
    border-radius: 5px;
    cursor: pointer;
    transition: background-color 0.3s;
}

.submit-button:hover {
    background-color: #005999;
}


/* Responsive Styles */
@media (max-width: 768px) {
    .container {
        grid-template-columns: 1fr;
    }

    .preview-box,
    .notes-tags-box,
    .markdown-meta-box {
        grid-column: 1 / 2;
    }

    .notes-tags-box, .markdown-meta-box {
        grid-template-columns: 1fr;
    }
}
</style>
</head>
<body>

    <div class="container">
        <!-- Preview Box (spans both columns) -->
        <div class="box preview-box" id="preview-container">
            <h2>Preview of Selection</h2> <!-- Headline stays outside of the rendered content area -->
            <div id="preview">
                <p>Markdown content will be previewed here.</p>
            </div>
        </div>

        <!-- Notes and Tags Side by Side -->
        <div class="notes-tags-box">
            <div class="box notes-section">
                <h3>Notes</h3>
                <textarea id="notes" class="note-field" placeholder="Enter your notes here..."></textarea>
            </div>

            <div class="box tags-section">
                <h3>Tags</h3>
                <input type="text" id="tags" class="tag-input" placeholder="Enter tags separated by commas">
                <div class="checkbox-group">
                    <label><input type="checkbox"> Review</label>
                    <label><input type="checkbox"> Obsidian</label>
                    <label><input type="checkbox"> AppleShortcuts</label>
                    <label><input type="checkbox"> macOS</label>
                    <label><input type="checkbox"> iPadOS</label>
                </div>
            </div>
        </div>

        <!-- Markdown and Meta Information Side by Side -->
        <div class="markdown-meta-box">
            <div class="box markdown-section">
                <h3>Markdown</h3>
                <textarea id="markdown" placeholder="Enter markdown content here..." oninput="updatePreview()"></textarea>
            </div>

            <div class="box meta-section">
                <h3>URL</h3>
                <input type="text" id="url" placeholder="Enter URL">
                <h3>Page Title</h3>
                <input type="text" id="title" placeholder="Enter page title">
            </div>
        </div>
    </div>


    <button class="submit-button" onclick="handleSubmit()">Submit</button>

    <script>
        function updatePreview() {
            const markdownContent = document.getElementById('markdown').value;
            const previewBox = document.getElementById('preview');
            previewBox.innerHTML = marked.parse(markdownContent);
        }

        function handleSubmit() {
            const notes = document.getElementById('notes').value;
            const tagsInput = document.getElementById('tags').value;
            const markdown = document.getElementById('markdown').value;
            const url = document.getElementById('url').value;
            const title = document.getElementById('title').value;

            const tagsArray = tagsInput.split(',')
            .map(tag => `#${tag.trim()}`)
            .filter(tag => tag.length > 1);

            const checkedTags = Array.from(document.querySelectorAll('.checkbox-group input[type="checkbox"]:checked'))
            .map(checkbox => `#${checkbox.parentElement.textContent.trim()}`);

            const tags = [...tagsArray, ...checkedTags];

            const data = {
                notes: notes,
                tags: tags,
                markdown: markdown,
                url: url,
                title: title
            };

            const jsonString = JSON.stringify(data);
            window.location.href = `shortcuts://run-shortcut?name=Snippets+&input=${encodeURIComponent(jsonString)}`;
        }
    </script>
</body>
</html>
The Snippet+
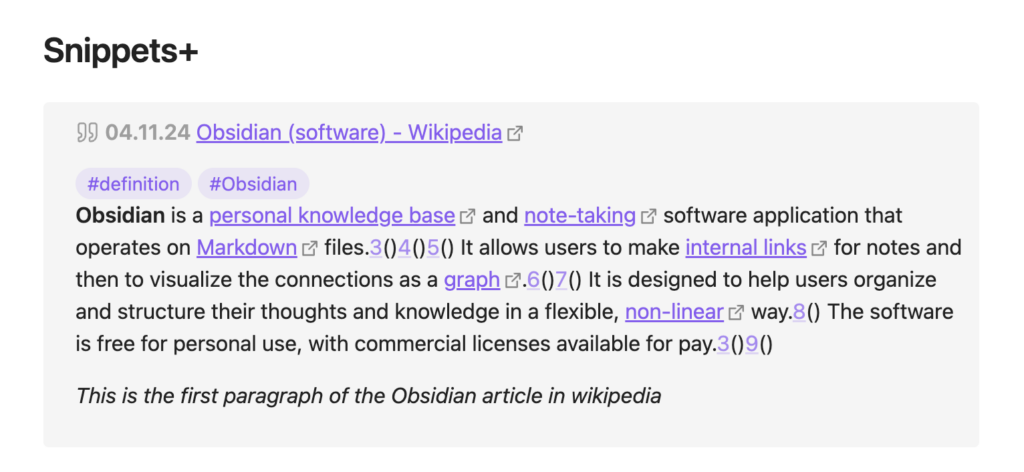
Before creating the shortcut, let’s take a look at how a snippet will be structured. The snippet consists of four distinct sections:
- Header: The header begins with the callout indicator
> [!quote]. This is followed by the current date, the page title, and the page URL. - Tags: The second section contains a line with tags that are relevant to the snippet.
- Selection: The third section displays the browser selection formatted in Markdown.
- Note: The note is rendered in italics in the fourth section to distinguish it from the selection section.
Here is an example in Markdown format, along with a screen capture from Obsidian:
> [!quote]  4.11.24 [Obsidian (software) - Wikipedia](https://en.wikipedia.org/wiki/Obsidian_(software))
>#definiton #Obsidian
> **Obsidian** is a [personal knowledge base](https://en.wikipedia.org/wiki/Personal_knowledge_base) and [note-taking](https://en.wikipedia.org/wiki/Note-taking) software application that operates on [Markdown](https://en.wikipedia.org/wiki/Markdown) files.[[3]]()[[4]]()[[5]]() It allows users to make [internal links](https://en.wikipedia.org/wiki/Internal_links) for notes and then to visualize the connections as a [graph](https://en.wikipedia.org/wiki/Graph_(discrete_mathematics)).[[6]]()[[7]]() It is designed to help users organize and structure their thoughts and knowledge in a flexible, [non-linear](https://en.wikipedia.org/wiki/Nonlinear_system) way.[[8]]() The software is free for personal use, with commercial licenses available for pay.[[3]]()[[9]]()
>
> *This is the first paragraph of the Obsidian article in wikipedia*

The Shortcut
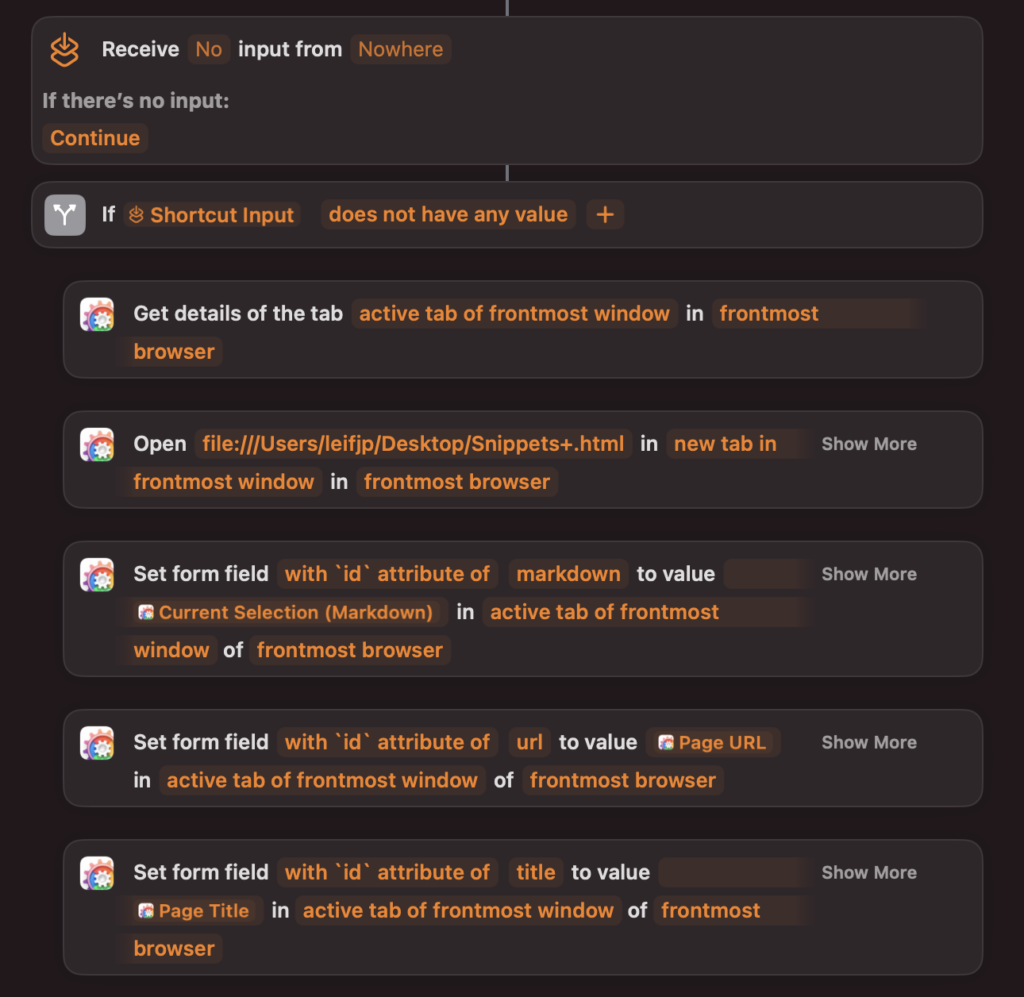
The first block in most shortcuts defines the source of the “shortcut input.” For this shortcut we need a “Receive No input Nowhere” input block, because we don’t need any other input source. This option cannot be selected directly. The easiest way to achieve this is to first drag the if action into the Shortcut editor and then select “Shortcut Input” as the input parameter. Then, the block with the source “Nowhere” will appear, where the first parameter has to set to No.
With the already implemented if/otherwise action in the editor, the shortcut can now be defined. The “if” condition will be executed when the shortcut is called on a browser window with a selection, retrieving all the necessary data from the active browser tab. Conversely, the “otherwise” condition will be processed when the shortcut is invoked via the submit button on the HTML form page, where it will build and create the snippet.
First, let’s examine what happens when the ‘if’ condition detects no input. In this case, the actions from the “Browser-Actions” app come into play. The attributes of the active webpage are retrieved using the action “Get Details of the tab active tab of frontmost window in frontmost browser.” A list of possible result parameters can be found in the documentation.
In the final step, the HTML file will open in a new tab of the active browser, and the corresponding fields for the page URL, page title, and markup will be populated with the retrieved data. This is accomplished using the action “Set form field with ‘id’ attribute of field name to value parameter in active tab of frontmost window in frontmost browser” from the “Browser Actions” app.
Once the fields are filled with data, the user can add additional notes and tags. Upon clicking the “Submit Button,” the “otherwise” condition will be executed, as the shortcut is now called with input in the form of a JSON string.

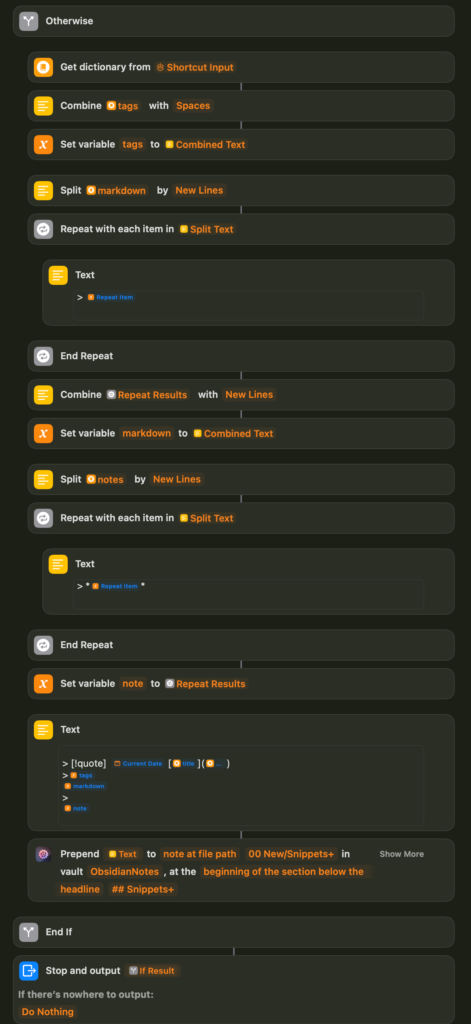
The actions in the ”otherwise” condition convert and prepare the JSON input to create the snippet, which is then included on the snippet page.
First, the tags are converted into a string, separated by spaces. The result of the ”combine” action is assigned to the variable tags. To access the “value” of a “key,” specify the dictionary as the data source in the action. Then, in the selection popup, enter the name of the key you want to retrieve in the input at the bottom, which in this case is “tabs.”
Adding the > character to the beginning of each line of the Markdown from the retrieved selection is a bit tricky. First, the entire text is converted into a list, where each line represents an item. Then, this list is iterated over in a loop, and the > character is prepended to each item. The result, again a list, must be converted back into a string, with each item separated by a line break. The result of this conversation is assign to the variable markdown. The same procedure has to be done with the note provided by the user.
Now the snippet can be built in a text box as specified above. This box then will be prepends to the Snippets+ Note (in my case in the vault “Obsidian Notes” below the headline ## Snippets+)
The “Stop and output” action is created automatically after the first run.

Last Words
That’s all. Test this shortcut with the HTML form in every browser except Firefox and Arc. As I mentioned in my previous article, I only add most of my shortcuts to the Finders Shortcuts menu, as this is the easiest way for me to access them. If you assign other methods, such as keyboard shortcuts, ensure that the “Shortcut Input” box remains set to “No” and “Nowhere.” Otherwise, it might result in the wrong part of the conditional statement being executed.
The capabilities in iOS and iPadOS are much more restricted, which means that “Browser Actions” only runs on macOS. As a result, this shortcut is not useful for mobile usage. Due to this limitation, I call the HTML file locally on my MacBook, but it’s also possible to call it from a web server.
The example presented is certainly not perfect. It is intended only to inspire your own ideas on how these apps can be used. At the moment, I am using this shortcut extensively. This often leads to new ideas on how this workflow can be improved and enhanced.
Have fun, and special thanks to Carlo for these two apps.
As always, please leave any feedback, corrections, or ideas in the comments.


Leave a Reply