Due to a copy and paste issue, the explanation of the HTML code wasn’t published in the first version. Sorry for any inconvenience.
As a frequent user of Actions for Obsidian, I check the Community Forum often. A few days ago, a user asked the following question: How can I create an input form for multiple inputs? to create an Obsidian note.
Since I was looking for use cases for the new beta app from Carlo Zottmann, Browser Actions, I thought this could be a good use case. My first idea was to create a web form for the questionnaire, then fetch all the entries using “Browser Actions” within a shortcut, compose the markdown with all the entries, and finally use “Actions for Obsidian” to create the note in the Obsidian Vault.
However, I didn’t want to open a webpage first and then start the workflow. Fortunately, Carlo also asked his followers on Mastodon for ideas on how to create something that can collect multiple entries. @davidbures@mstdn.social proposed a flow that solved my problem.
The Flow of the Example
David showed how the same shortcut can be used in different ways depending on how it’s called. When the shortcut is run without any arguments, it follows the if branch of a conditional statement, which opens an HTML form in Safari. This form allows the user to enter health parameters.
Once the form is filled out, the user clicks the submit button. This triggers the shortcut again, but now with the input data passed as a string. Since the shortcut is now called with input, it follows the else branch of the conditional statement, where the input (field labels and values) can be processed. It would also be possible to respond to the type of input and create different branches for different inputs.
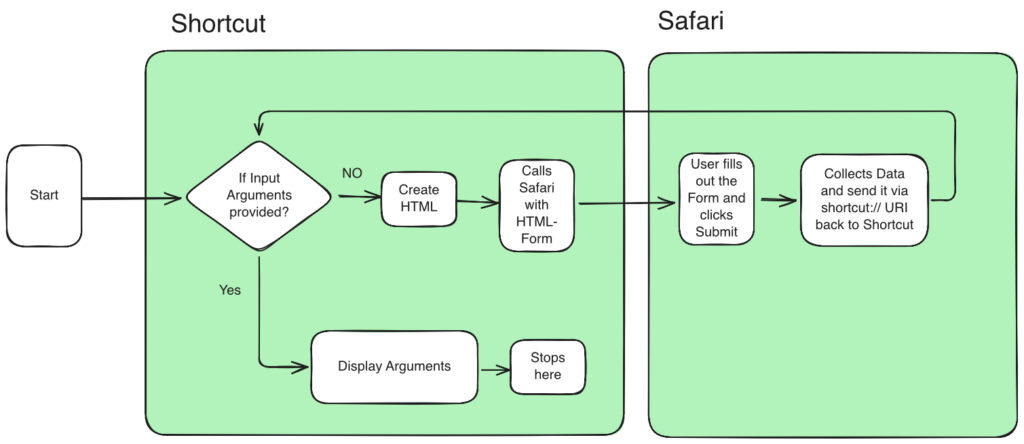
Finding a Solution. for all Apple Platforms
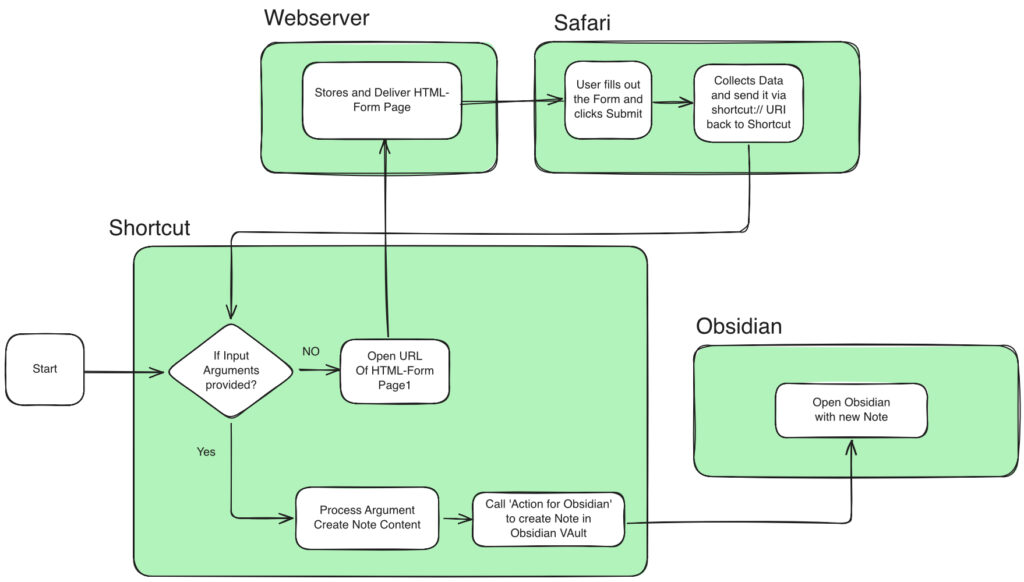
Unfortunately, David’s suggestion only worked on iOS devices because it calls the HTML with a “data construct” that is not supported on macOS. So, I looked for another way with a slightly different flow.
My initial approach of using the new ‘Browser Actions’ app to read the data from the fields in the form worked well (it is published in the forum post), but only on the Mac. Since the questioner asked for an iOS/iPadOS solution, I found a solution that works on both macOS and iOS/iPadOS and could be a blueprint for similar problems.
On MacOS, the HTML file can be saved and opened locally, but on iOS and iPadOS, it is not possible to open a local HTML file with any browser. Therefore, a web server is required to store and access the HTML file. Another limitation is that the “Open URL” action only works with Safari. If you want to use this approach on MacOS only, I recommend using “Browser Actions” with the “Open URL” action. This action supports most other browsers on the Mac.
To create an Obsidian note, I rely on “Actions for Obsidian”. There may be other ways, but for me, working within shortcuts and Obsidian’s Actions for Browser is just the easiest way.
The HTML-Form
Because the customer of Carlo asked for a form to make entries with health data, I created this small form with different UI elements for data entry. To be honest, in this case, I asked “Perplexity” to create an example form.
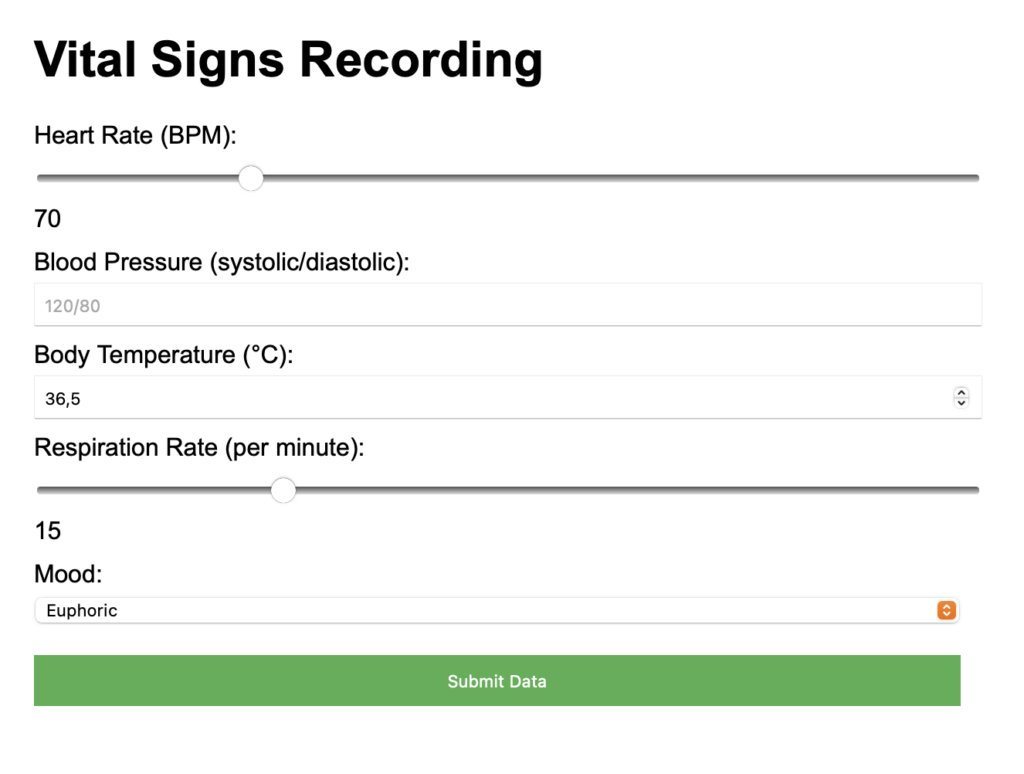
Here is the HTML Code:
<!DOCTYPE html>
<html lang="en">
<head>
    <meta charset="UTF-8">
    <meta name="viewport" content="width=device-width, initial-scale=1.0">
    <title>Vital Data Recording</title>
    <style>
        body { font-family: Arial, sans-serif; max-width: 600px; margin: 0 auto; padding: 20px; }
        label { display: block; margin-top: 10px; }
        input, select { width: 100%; padding: 5px; margin-top: 5px; }
        button { margin-top: 20px; background-color: #4CAF50; color: white; border: none; padding: 10px; cursor: pointer; width: 100%; }
    </style>
</head>
<body>
    <h1>Vital Data Recording</h1>
    <form id="vitalSignsForm">
        <label for="heartRate">Heart Rate (BPM):</label>
        <input type="range" id="heartRate" name="heartRate" min="40" max="180" value="70">
        <output for="heartRate"></output>

        <label for="bloodPressure">Blood Pressure (systolic/diastolic):</label>
        <input type="text" id="bloodPressure" name="bloodPressure" placeholder="120/80">

        <label for="temperature">Body Temperature (°C):</label>
        <input type="number" id="temperature" name="temperature" min="35" max="42" step="0.1" value="36.5">

        <label for="respiration">Respiration Rate (per minute):</label>
        <input type="range" id="respiration" name="respiration" min="10" max="30" value="15">
        <output for="respiration"></output>

        <label for="Mood">Mood:</label>
        <select id="Mood" name="mood">
            <option value="euphoric">Euphoric</option>
            <option value="neutral">Neutral</option>
            <option value="frustrated">Frustrated</option>
        </select>

        <button type="button" onclick="sendData()">Submit Data</button>
    </form>

    <script>

        // Updates the display of the slider values
        document.querySelectorAll('input[type="range"]').forEach(function(slider) {
            slider.nextElementSibling.value = slider.value;
            slider.oninput = function() {
                this.nextElementSibling.value = this.value;
            }
        });

    function sendData() {
        var form = document.getElementById('vitalSignsForm');
        var formData = new FormData(form);
        var jsonObject = {};

        for (var pair of formData.entries()) {
            jsonObject[pair[0]] = pair[1];
        }

        var jsonString = JSON.stringify(jsonObject);
        var shortcutURL = "shortcuts://run-shortcut?name=vital&input=" + encodeURIComponent(jsonString);
        window.location.href = shortcutURL;
}
    </script>
</body>
</html>
In this HTML, there are two parts besides the header with some CSS. The form with the ID vitalSignsForm contains several inputs with different types: a slider for the heart rate, a text input for the blood pressure, a number input for the body temperature, another slider for the respiration rate, a dropdown for the mood, and finally a submit button to send the data.
Next, there are two JavaScript functions. The first part updates the value of the inputs that are controlled by the sliders; every time the slider changes, this part updates the input value. The second part, the function sendData(), will be executed when the user clicks the submit data button.
First, it finds the form by its ID and collects it in the FormData object. Then it creates a data object. In the form loop, the jsonObject will be filled with the key-value pairs of the formData object.
After finishing the loop, the jsonObject will be converted into a JSON string, which will be encoded for safe transfer in a URL.
The URL shortcuts://run-shortcut?name=vital&input= is a command to launch the Apple Shortcut named “vital” and pass encoded JSON data to the shortcut for processing.
That’s the HTML part of the solution. You can now copy this file to any local or external web server.
The shortcut
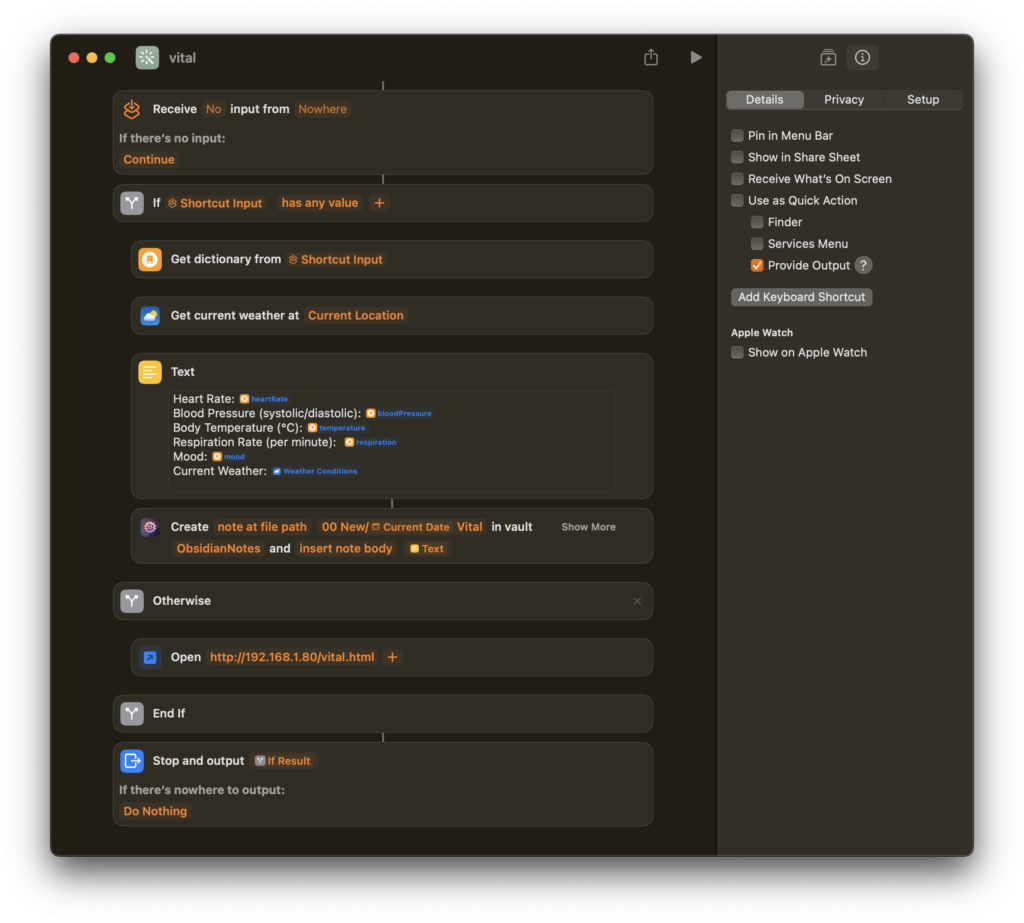
For the shortcut, there is no need to click anything in the details pane of the shortcut app. The “Provide Output” option became, at least in my test, automatically checked when the shortcut runs for the first time.
It took me some time to understand that the “Receive No input from Nowhere If there’s no input: continue” couldn’t be chosen from any detail option. Then I fifure out, that it will also be created during the first run. Just put the if action into the pane and press the run button.
It is important to name the shortcut the same as the call in the HTML form.
The if conditional checks if the shortcut is called with input parameters; if not, it skips to the otherwise branch, where it opens the HTML form from a web server.
When the web form is filled out and the user presses the “Submit Data” button, the if branch will be processed. To work with the input from the form, the easiest way is to transform the JSON string into a dictionary with the action “Get dictionary from Shortcut Input.”
It’s possible to add some additional data that are not part of the form; here I added, as an example, the current weather conditions. If you are only on iOS and partly on iPadOS, you can also fetch some health data from the Apple Health app or some other health app from the App Store.
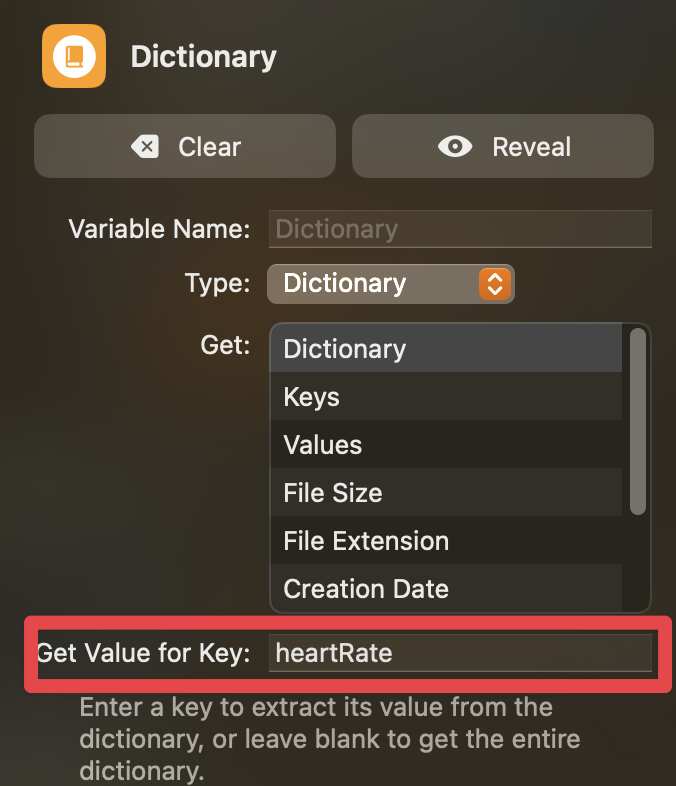
Next, the markdown for the note is created in a “Text” container. You can access the data directly from the dictionary by typing the key into the field with the red border in the image. It’s the same as the id in the HTML form.
The last action is to create a note from that text box content. I save the note in my Obsidian folder “00 New”; with a name, where I use the current date and the string “vital.” The note will be saved in my Vault “ObsidianNotes,” and the text will be inserted into the note body.
How to Run This Shortcut
You can start the shortcut with the run button in the shortcut app. My preferred way is to save it in the dock (File –> Add to Dock). When you do this, the shortcut will be saved in your user’s application folder (~/Application or /Users/UserName/Application). In my case, it’s part of the search for apps, so Spotlight, Siri, Alfred Launcher, or Raycast all will find it. If you don’t want it in the Dock, you can just move it out; the app will stay where it is.
Conclusion
If you want a nice form-based input with a great UI and user experience, an HTML form seems to be the best way to go. This works well for Obsidian but may also be suitable for other applications. The example I used here is very simple, and in terms of health data, it might make more sense to use the data directly from the apps on the iPhone. However, I like the idea of starting a shortcut and using an HTML page for form-based data entry.
Currently, I’m thinking about my next project to enhance my snippets shortcut example by adding more user-created information, like tags or notes, before saving it in Obsidian.
If you have any ideas, please share them in the comments. Questions, feedback, and suggestions are also welcome.


Leave a Reply