To test the new ChatGPT 4.0, I wanted to create a shortcut that would save my Obsidian Vault to my Synology NAS at the push of a button. Once we had a solution, I wondered why this backup process shouldn’t be automated and periodic.
ChatGPT 4.0 suggested using a shell script called via the launchd system service to run the shortcut. launchd automatically starts programs or scripts on a schedule. While it might seem over-engineered to wrap a command-line command in a shortcut and then call it via a shell script, I found the process interesting. Since there’s not much information available online, I created this general guide.
Step 1: Creating a shortcut
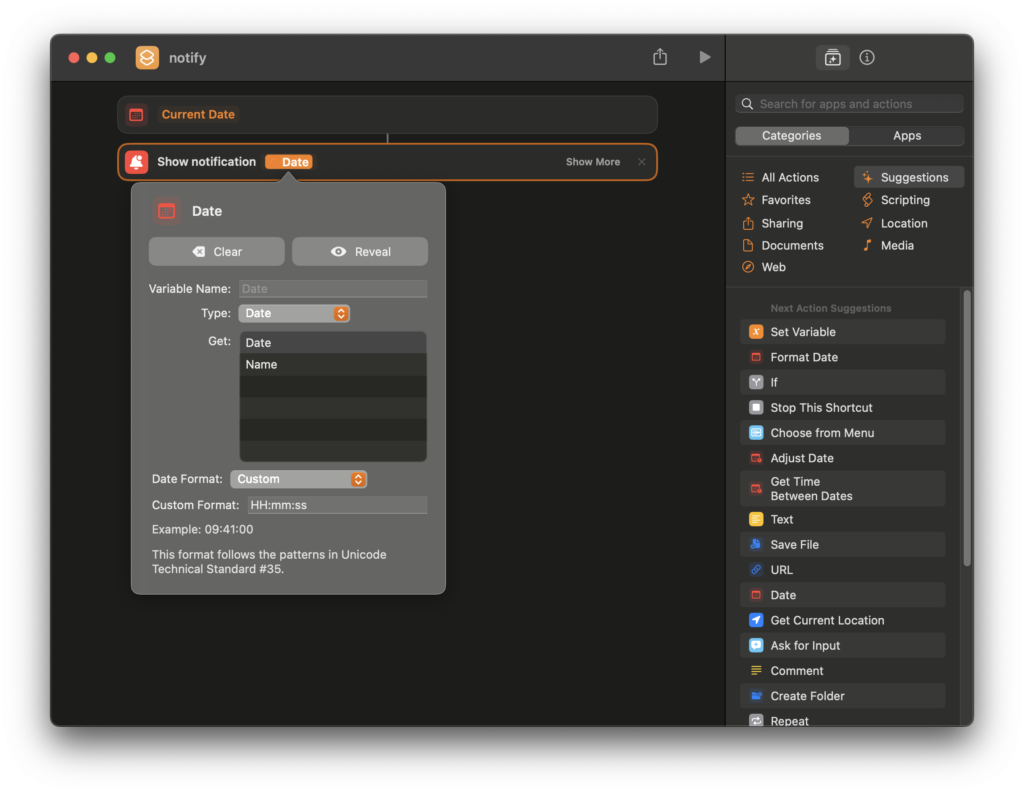
For this article, I have created a very simple shortcut that displays the current time in the notification center:

I have slightly adapted the output format for the date, as can be seen on the screenshot.
You can now test in the terminal whether the shortcut works as desired:
shortcuts run notifyYou should see the current time as notification.
Once this has worked, the second step can be tackled.
Step 2: Create a Shell Script
To execute the short command with launchd, it is easiest to wrap the call in a shell script that looks like this:
#!/bin/bash
/usr/bin/shortcuts run notify
I saved this shell script as notify.sh in the folder /User/leif/Applications and make it executable:
chmod +x /User/leif/Applications/notify.shStep 3: Create a launchd plist File
A plist file is required to start the script with launchd. This file must be created in the directory ~/Library/LaunchAgents. For my example it looks like this:
<?xml version="1.0" encoding="UTF-8"?>
<!DOCTYPE plist PUBLIC "-//Apple Computer//DTD PLIST 1.0//EN" "http://www.apple.com/DTDs/PropertyList-1.0.dtd">
<plist version="1.0">
<dict>
    <key>Label</key>
    <string>com.leif.notify.plist</string>
    <key>ProgramArguments</key>
    <array>
        <string>/Users/leif/Applications/notify.sh</string>
    </array>
    <key>StartInterval</key>
    <integer>15</integer>
    <key>RunAtLoad</key>
    <true/>
    <key>StandardOutPath</key>
    <string>/tmp/notify.log</string>
    <key>StandardErrorPath</key>
    <string>/tmp/notify.err</string>
</dict>
</plist>Explanation of the entries:
- Label: The name of the job.
- ProgramArguments: The path to the shell script that runs the shortcut.
- RunAtLoad: Ensures the job is loaded into the job list at login.
- StartInterval: The interval in seconds at which the job runs (here: 15 seconds).
- StandardOutPath/StandardErrorPath: Paths to the files for logging output information.
Step 4: Start the Job
With the following command, the plist file is registered with launchd, so the job can be started:
launchctl load ~/Library/LaunchAgents/com.leif.notify.plistAfter that, the job can be started, which usually happens at system startup due to the RunAtLoad parameter:
launchctl start com.leif.notify.plistTo check if the job is running, type this:
launchctl list | grep com.leif.notify.plistIf something doesn’t work, you can find relevant information in the log files defined above.
Some additional notes:
To stop a job, it can be “unloaded” with the following command:
launchctl unload ~/Library/LaunchAgents/com.leif.notify.plistThis command stops the job and removes it from the list of active launchd jobs.
Afterward, the job can be completely deleted with the command:
rm ~/Library/LaunchAgents/com.leif.notify.plistIt is recommended to make a backup of the plist file beforehand.
For more configuration options, such as running a job at a specific time, refer to resources like A launchd Tutorial or the detailed About Daemons and Services.
Conclusion
I hope this guide has been helpful and inspiring for further ideas. I will present my solution for backing up my vault, which will run without using Shortcuts, in another post. If you have any errors to report, additions, or other remarks, feel free to leave a comment.


Leave a Reply