
On the German side of my blog, I wrote three articles about using launchd as a scheduler for shortcuts, creating a 1‑click shortcut to sync a folder from a Mac to a Synology NAS using rsync, and in the third using rsync and launchd to schedule a backup that includes saving deleted files from the source to a special folder on the Synology NAS. In this article, I will combine these topics into one guide.
I will explain how to use rsync to save a copy on another server, specifically a Synology NAS. I will show you how to turn this shell command into a shortcut, and finally, how to extent it into a real backup solution that runs periodically using the launchd framework on macOS.
Let’s start with the basic rsync command creation.
SSH and Rsync Setup
To copy the Obsidian Vault, the rsync command with ssh as the transfer protocol is used. Therefore, it is necessary to enable ssh on both the Mac and the Synology NAS.
On macOS, ssh is usually installed by default. If not, it can be easily installed via Homebrew. There are plenty of instructions available online if assistance is needed.
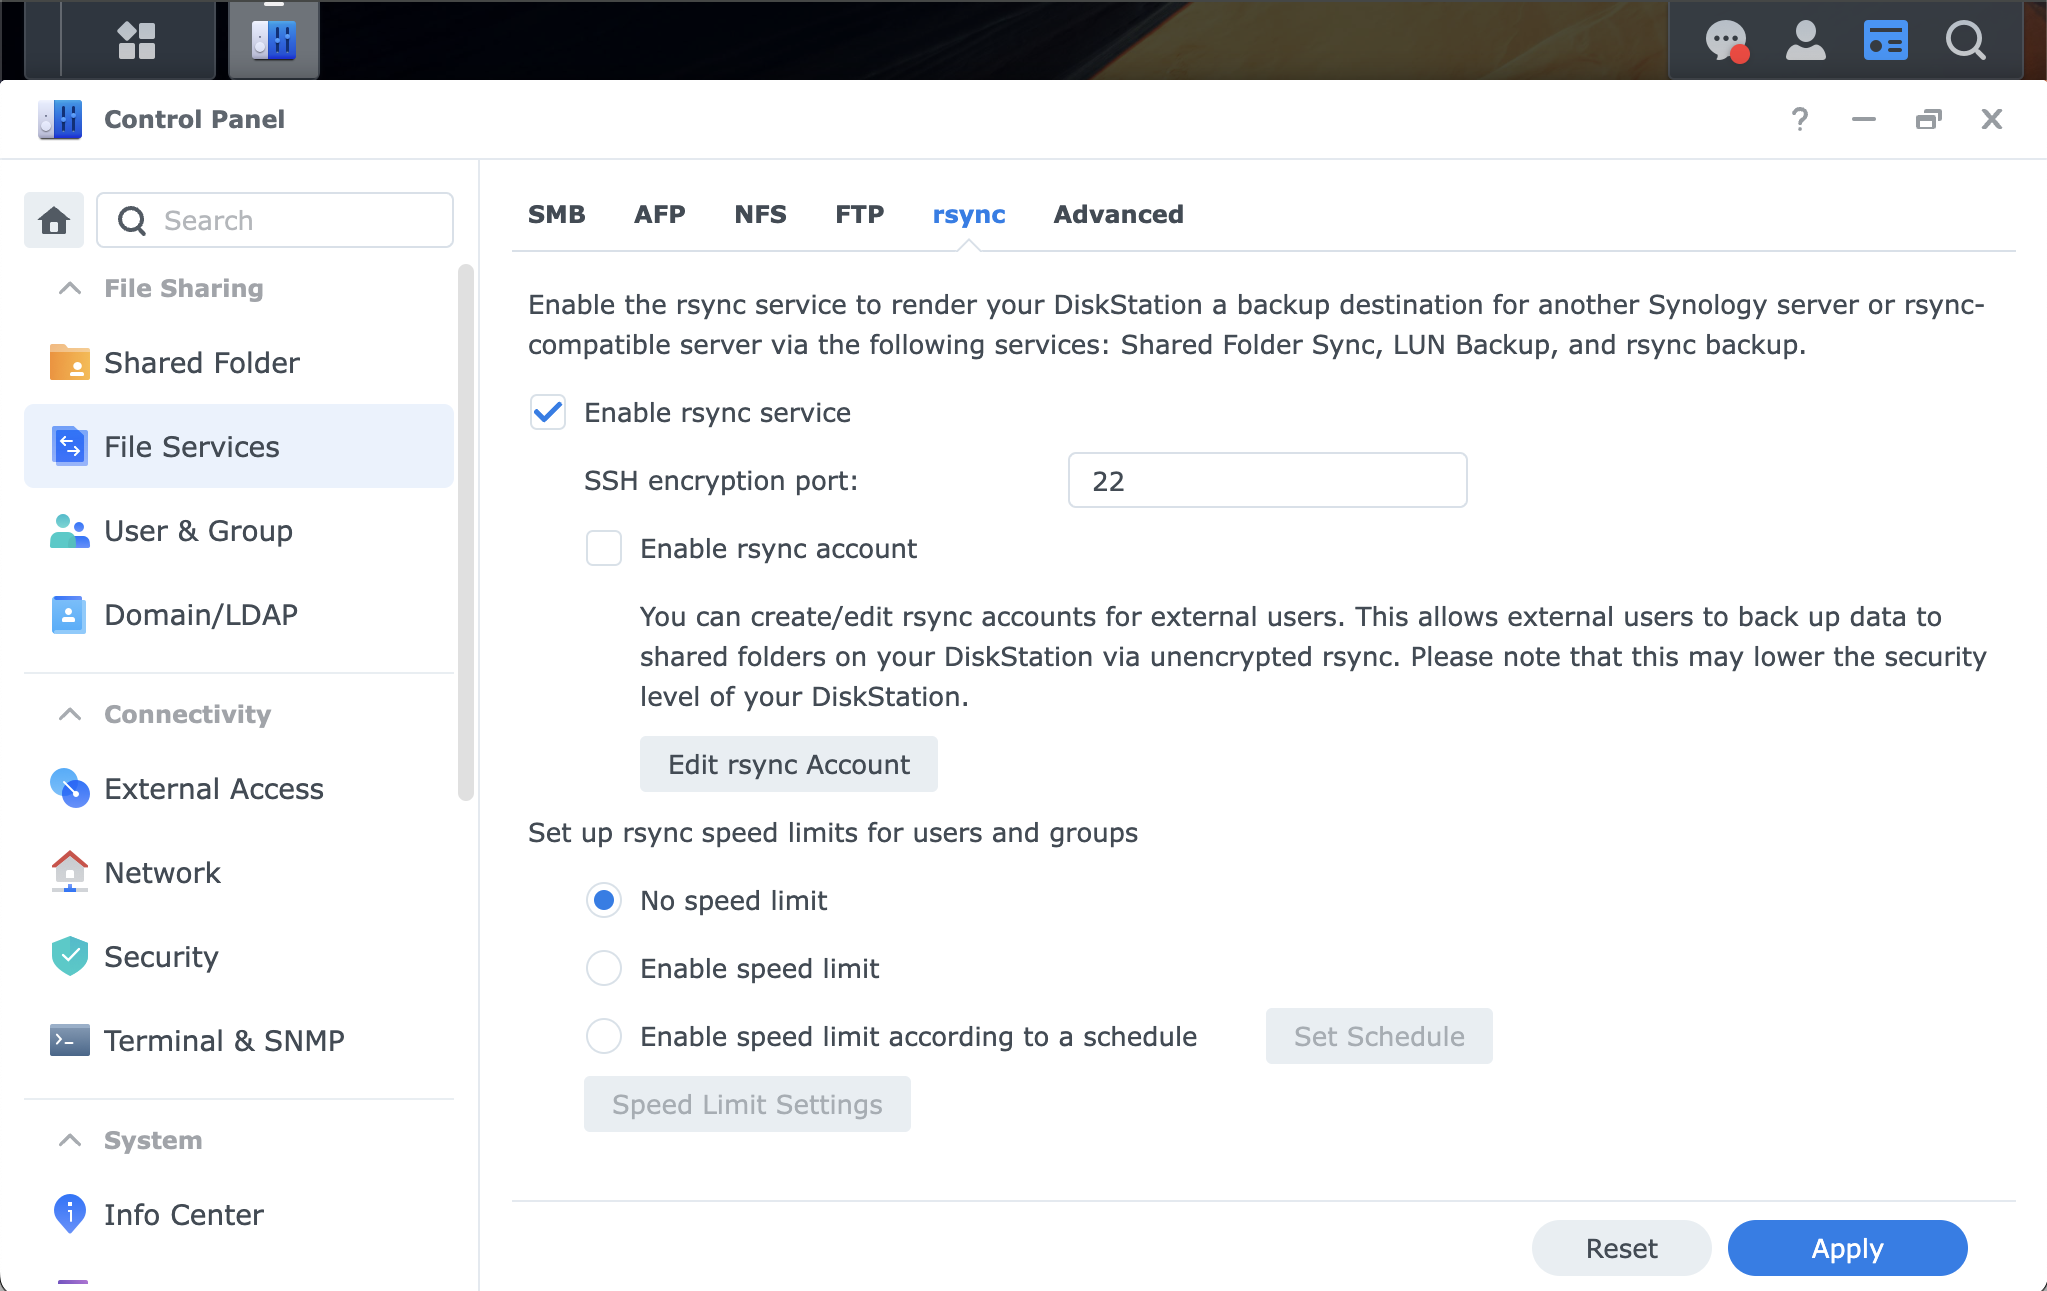
On the Synology side, rsync must be enabled via the Synology Control Panel:
Once ssh is set up on both the Mac and the Synology, test the connection. Depending on the router setup, the Synology can be accessed using an internal hostname like synology.lan or a fixed IP address. It is recommended to use a fixed IP address. In this case, the Synology is reachable at 192.168.1.80. To test the connection:
ssh user:password@192.168.1.80If the username on both the Mac and Synology is the same, use:
ssh 192.168.1.80The first time you log on, the following message will appear:
The authenticity of host '192.168.1.80 (192.168.1.80)' can't be established.
ED25519 key fingerprint is SHA256:yourkeyhere.
This key is not known by any other names.
Are you sure you want to continue connecting (yes/no/[fingerprint])?
Warning: Permanently added '192.168.1.80' (ED25519) to the list of known hosts.
leif@192.168.1.80's password:
This is a security feature because the Mac has no prior record of the server’s public key. Answering “yes” stores this public key in the ~/.ssh/known-hosts file. This helps prevent man-in-the-middle attacks by identifying the server. If another machine uses the same IP address and presents a different key, SSH will warn about the key mismatch and prevent the connection. After confirming with “yes,” the Synology password is required for login. After entering the password, the following text may appear:
Using terminal commands to modify system configs, execute external binary files, add files, or install unauthorized third-party apps may lead to system damages or unexpected behavior, or cause data loss. Make sure you are aware of the consequences of each command and proceed at your own risk.

Warning: Data should only be stored in shared folders. Data stored elsewhere may be deleted when the system is updated/restarted.

leif@192.168.1.80:~$
Type exit to return to the Mac in your terminal session.
This is the basic setup to access the Synology with ssh. However, typing the password every time can be inconvenient, especially for script access. Additional steps are needed to enable passwordless access.
Step 1: Creating a Public and Private Key Pair for Server Access
Using keys for server access enhances security and enables the automatic login needed for scripts. Setting up a key pair is easy:
ssh-keygen -a 420 -f ~/.ssh/synology-tutorial.ed25519 -C "My Synology Tutorial key"This generates the key pair:
- Private Key:
~/.ssh/synology-tutorial.ed25519 - Public Key:
~/.ssh/synology-tutorial.ed25519.pub
- The
-a 420option sets the number of key derivation function rounds to 420, enhancing security by making it harder for an attacker to brute-force the passphrase. - The
-f ~/.ssh/synology-tutorial.ed25519option specifies the location and name of the private key. The public key will be saved with the same name and location, but with a .pub extension. - The
-C "My Synology Tutorial key"option adds a comment to the key, making it easier to identify the key’s purpose or the owner when viewing the public key file.
During key generation, the command will prompt for setting a passphrase. It is recommended to set a passphrase different from your Mac or server password for added security. A passphrase can be longer and more complex than a typical password (e.g. it can also contains spaces). It is recommended to use a strong, unique passphrase to maximize security.
Although it is possible to use a single key pair for multiple servers, creating a specific key pair for each server makes managing access easier and allows revocation of a key pair for one server without invalidating connections to others.
Step 2: Copying the public key to the server
As the next step, the public key needs to be copied to the server:
ssh-copy-id -i ~/.ssh/synology-tutorial.ed25519.pub 192.168.1.80The ‑i option specifies the key that should be copied to the server. Because the username on the Mac is the same as on the Synology, there is no need to specify the username in the command. If the usernames differ, use user@192.168.1.80 to specify the username. You will be asked for the users password on the server, not for the passphrase you defined when generating the keys.
Now it’s time to check if everything is working:
ssh -i ~/.ssh/synology-tutorial.ed25519 192.168.1.80This command will prompt for the passphrase set during key generation and should allow login without asking for the server’s password. However, this still substitutes a password with a possibly more complex passphrase. In the next step, the process of logging into the Synology using an alias and without any credentials will be explained.
3. Creating a ssh-config file
Creating an SSH config file centralizes the management of SSH connections. It simplifies connections and eliminates the need to repeatedly enter passwords or passphrases, which is especially useful when using SSH in scripts. For example:
ssh synologycan be used in scripts instead of full connection details.
Here is the SSH config used for this article:
Host synology
    HostName 192.168.1.80
    AddKeysToAgent yes
    UseKeychain yes
    User leif
    PreferredAuthentications publickey
IdentityFile ~/.ssh/synology-tutorial.ed25519- Host synology: Defines an alias for this configuration, allowing connection to the Synology using the alias instead of the full hostname or IP address.
- HostName: Specifies the actual hostname or IP address of the Synology. This tells the SSH client where to connect.
- AddKeysToAgent yes: Adds the key passphrase to the SSH authentication agent (ssh-agent) when the configuration is first used.
- UseKeychain yes: A macOS-specific option to store the passphrase in the keychain. This is convenient on a Mac, as the ssh-agent only stores the passphrase during the session, while UseKeychain stores it across sessions.
- User leif: Specifies the username to use when connecting to the Synology.
- PreferredAuthentications publickey: Specifies the authentication method to use. In this case, it should be publickey.
- IdentityFile ~/.ssh/synology-tutorial.ed25519: Specifies the private key file to use for authentication.
Before testing this configuration, there is one more command that might be helpful because it will explicitly store the passphrase to the keychain and ssh-agent:
ssh-add --apple-use-keychain ~/.ssh/synology-tutorial.ed25519Now, its possible to test the connection with the alias:
ssh synologyPossible Issue: Permissions
During a test on a fresh copy of macOS on a virtual machine, I encounter an issue that was not present on my working Mac set up previously:
@@@@@@@@@@@@@@@@@@@@@@@@@@@@@@@@@@@@@@@@@@@@@@@@@@@@@@@@@@@
@ WARNING: UNPROTECTED PRIVATE KEY FILE! @
@@@@@@@@@@@@@@@@@@@@@@@@@@@@@@@@@@@@@@@@@@@@@@@@@@@@@@@@@@@
Permissions 0644 for '/Users/leif/.ssh/synology-tutorial.ed25519.pub' are too open.
It is required that your private key files are NOT accessible by others.
This private key will be ignored.
After some research, it was found that the permissions were not set correctly. The fix was to change the permissions for the folder:
chmod 700 ~/.sshand for all files inside the folder:
chmod 600 ~/.ssh/*After applying these fixes, everything should work correctly.
The Backup Script
For the backup script, I have the following requirements:
1. rsync Command
Choose rsync because it:
- Synchronize two folders by only copying changes and preserves all file and folder attributes.
- Synchronize files and folder from a local machine to a server.
- Delete files and folders in the destination that were deleted in the source, using the –delete option.
- Archive deleted files and folders in backup folders.
2. Backup Structure
The folder tree inside the Synology Home-folder should look like this. Besides the folder with the current Obsidian Vault, there are backup folders named using the format yyyy-mm-dd_hh-mm-ss:
myVault/
├── 2024-06-08_16-06-49
├── 2024-06-08_17-06-49
├── 2024-06-08_18-06-49
└── current
3. Logging
- Log each rsync execution with a timestamp, command output, and error messages in a log file (/tmp/myVault.log).
4. Limited Number of backup folders
- If the number of backups exceeds a defined limit, delete the oldest backups to conserve storage space.
5. 7. Conditional Execution
- The backup script should only run if the Synology NAS is reachable.
- If the NAS is not reachable (e.g., not connected to the local network), the script should exit without attempting to run the backup or delete old backups.
Complete Backup Script
Here is the complete script for backing up the Obsidian Vault folder to a Synology NAS:
#!/bin/bash

# Check if Synology NAS is reachable
if ping -c 1 192.168.1.80 &> /dev/null; then
    # Log the start of the backup
    echo -e "\n\n$(date +"%Y-%m-%d %H:%M:%S")" >> /tmp/myVault.log

    # Define backup variables
    SOURCE="/Users/leif/Documents/10 Obsidian/myVault/"
    DESTINATION="synology:/volume1/homes/leif/myVault/current"
    BACKUP_DIR_BASE="/volume1/homes/leif/myVault"
    MAX_BACKUPS=30
    TIMESTAMP=$(date +%Y-%m-%d_%H-%M-%S)
    BACKUP_DIR="${BACKUP_DIR_BASE}/${TIMESTAMP}"

    # Run rsync with backup options
    rsync -avz --delete --backup --backup-dir="${BACKUP_DIR}" --exclude='.DS_Store' --filter 'P @eaDir/' -e ssh "$SOURCE" "$DESTINATION" >> /tmp/myVault.log 2>&1

    # Check number of backup folders and delete oldest if necessary
    BACKUP_COUNT=$(ssh synology "ls -1 ${BACKUP_DIR_BASE} | grep -E '^[0-9]{4}-[0-9]{2}-[0-9]{2}_[0-9]{2}-[0-9]{2}-[0-9]{2}$' | wc -l")

    if [ "$BACKUP_COUNT" -gt "$MAX_BACKUPS" ]; then
        echo "The number of backups ($BACKUP_COUNT) exceeds the maximum ($MAX_BACKUPS). The oldest backups will be deleted." >> /tmp/myVault.log
        ssh synology "ls -1 ${BACKUP_DIR_BASE} | grep -E '^[0-9]{4}-[0-9]{2}-[0-9]{2}_[0-9]{2}-[0-9]{2}-[0-9]{2}$' | sort | head -n -${MAX_BACKUPS} | xargs -I {} rm -rf ${BACKUP_DIR_BASE}/{}" >> /tmp/myVault.log 2>&1
    fi
else
    # Log if server is not reachable
    echo "SERVER is not reachable. Backup will not be performed." >> /tmp/myVault.log
fi
The Script Line-by-Line Breakdown
if ping -c 1 192.168.1.80 &> /dev/null; thenThis line checks if the Synology NAS is reachable by sending one ICMP packet (ping) to the IP address 192.168.1.80. If the NAS responds, the script continues; otherwise, it exits. The if-clause evaluates the return code of the ping command: when the ping gets a response, the return code is 1 (true); if not, the return code is 0 (false).
echo -e "\n\n$(date +"%Y-%m-%d %H:%M:%S")" >> /tmp/myVault.logThis line logs the current date and time to /tmp/myVault.log, indicating when the backup process started. To structure the log, this command writes two newlines before the timestamp. All other log entries will written directly behind the previous line.
SOURCE="/Users/leif/Documents/10 Obsidian/myVault/"
DESTINATION="synology:/volume1/homes/leif/myVault/current"
BACKUP_DIR_BASE="/volume1/homes/leif/myVault"
MAX_BACKUPS=30
TIMESTAMP=$(date +%Y-%m-%d_%H-%M-%S)
BACKUP_DIR="${BACKUP_DIR_BASE}/${TIMESTAMP}"
These lines define the source directory (SOURCE), the destination directory on the Synology NAS (DESTINATION), the base directory for backups (BACKUP_DIR_BASE), the maximum number of backups to keep (MAX_BACKUPS), and the timestamp format for backup directories (TIMESTAMP and BACKUP_DIR).
rsync -avz --delete --backup --backup-dir="${BACKUP_DIR}" --exclude='.DS_Store' --filter 'P @eaDir/' -e ssh "$SOURCE" "$DESTINATION" >> /tmp/myVault.log 2>&1This line runs rsync with the following options:
-a:Archive mode to preserve file attributes.-v:Verbose mode to log detailed output.-z:Compress data during transfer.--delete:Delete files from the destination that have been deleted from the source.--backup:Enable backups of deleted files.--backup-dir="${BACKUP_DIR}":Specify the backup directory for deleted files.--exclude='.DS_Store':Exclude .DS_Store files from the backup.--filter 'P @eaDir/':Protect the @eaDir directory from being deleted. This directory is created by the Universal Search on the Synology. Since it’s not part of the source directory, it would otherwise always be deleted, and it contains a lot of files, so this would take time during every run of the script.-e ssh:Use SSH for data transfer."$SOURCE" and "$DESTINATION":Source and destination directories.
The output and any errors are appended to /tmp/myVault.log.
BACKUP_COUNT=$(ssh synology "ls -1 ${BACKUP_DIR_BASE} | grep -E '^[0-9]{4}-[0-9]{2}-[0-9]{2}_[0-9]{2}-[0-9]{2}-[0-9]{2}$' | wc -l")

if [ "$BACKUP_COUNT" -gt "$MAX_BACKUPS" ]; then
    echo "The number of backups ($BACKUP_COUNT) exceeds the maximum ($MAX_BACKUPS). The oldest backups will be deleted." >> /tmp/myVault.log
    ssh synology "ls -1 ${BACKUP_DIR_BASE} | grep -E '^[0-9]{4}-[0-9]{2}-[0-9]{2}_[0-9]{2}-[0-9]{2}-[0-9]{2}$' | sort | head -n -${MAX_BACKUPS} | xargs -I {} rm -rf ${BACKUP_DIR_BASE}/{}" >> /tmp/myVault.log 2>&1
fi
These lines perform the following actions:
- Count the number of existing backup folders in
BACKUP_DIR_BASEthat match the timestamp format. - If the count exceeds
MAX_BACKUPS, log a message indicating that the oldest backups will be deleted. - Delete the oldest backups, retaining only the latest
MAX_BACKUPSfolders.
There is a little unix (pipe) magic involved, eg. the script call a function on the Synology and store the result in a variable inside the script on the Mac. It pipes the result of an ls command to an grep, that filters with a regex expression only the directory that follow the backup naming convention, and then count the number of lines aka number of backup folder.
in the second part, if there are more then $MAX_BACKUPS, filters the folders again, sorts them by name and thus by age), deletes all newer folder names from the list, and then pipes the result to a command that deletes the folders by adding each list item to an rm -rf command.
else
    echo "SERVER is not reachable. Backup will not be performed." >> /tmp/myVault.log
fi
This handles the else part If the Synology NAS is not reachable. It log a message indicating that the backup will not be performed.
Saving and Running the Script
1. Save the Script
Save the script in your personal Applications folder ~/Applications as, for example, backup.sh, and make it executable with the following command:
chmod +x ~/Applications/backup.sh2. Create an Empty Log File
Create an empty log file to store the script’s output:
touch /tmp/myVault.log3. Run the Script
You can now run the script:
~/Applications/backup.sh4. Check the Log
Check the log to ensure everything runs smoothly without any errors.
cat /tmp/myVault.logDuring the first run, all files will be copied to your Synology, resulting in a long list of messages. For subsequent runs, the script will only log changes, so it might be a good idea to delete the log after the first run if everything was fine and then create a new one.
Creating a 1‑Click Backup Solution with Apple Shortcuts
Now we have a script that works very well when called in the terminal. To create a 1‑click backup solution, we can integrate this script into an Apple Shortcut.
So, my first Idea was to copy the script into a “Run Shell Script” action within an Apple Shortcut:
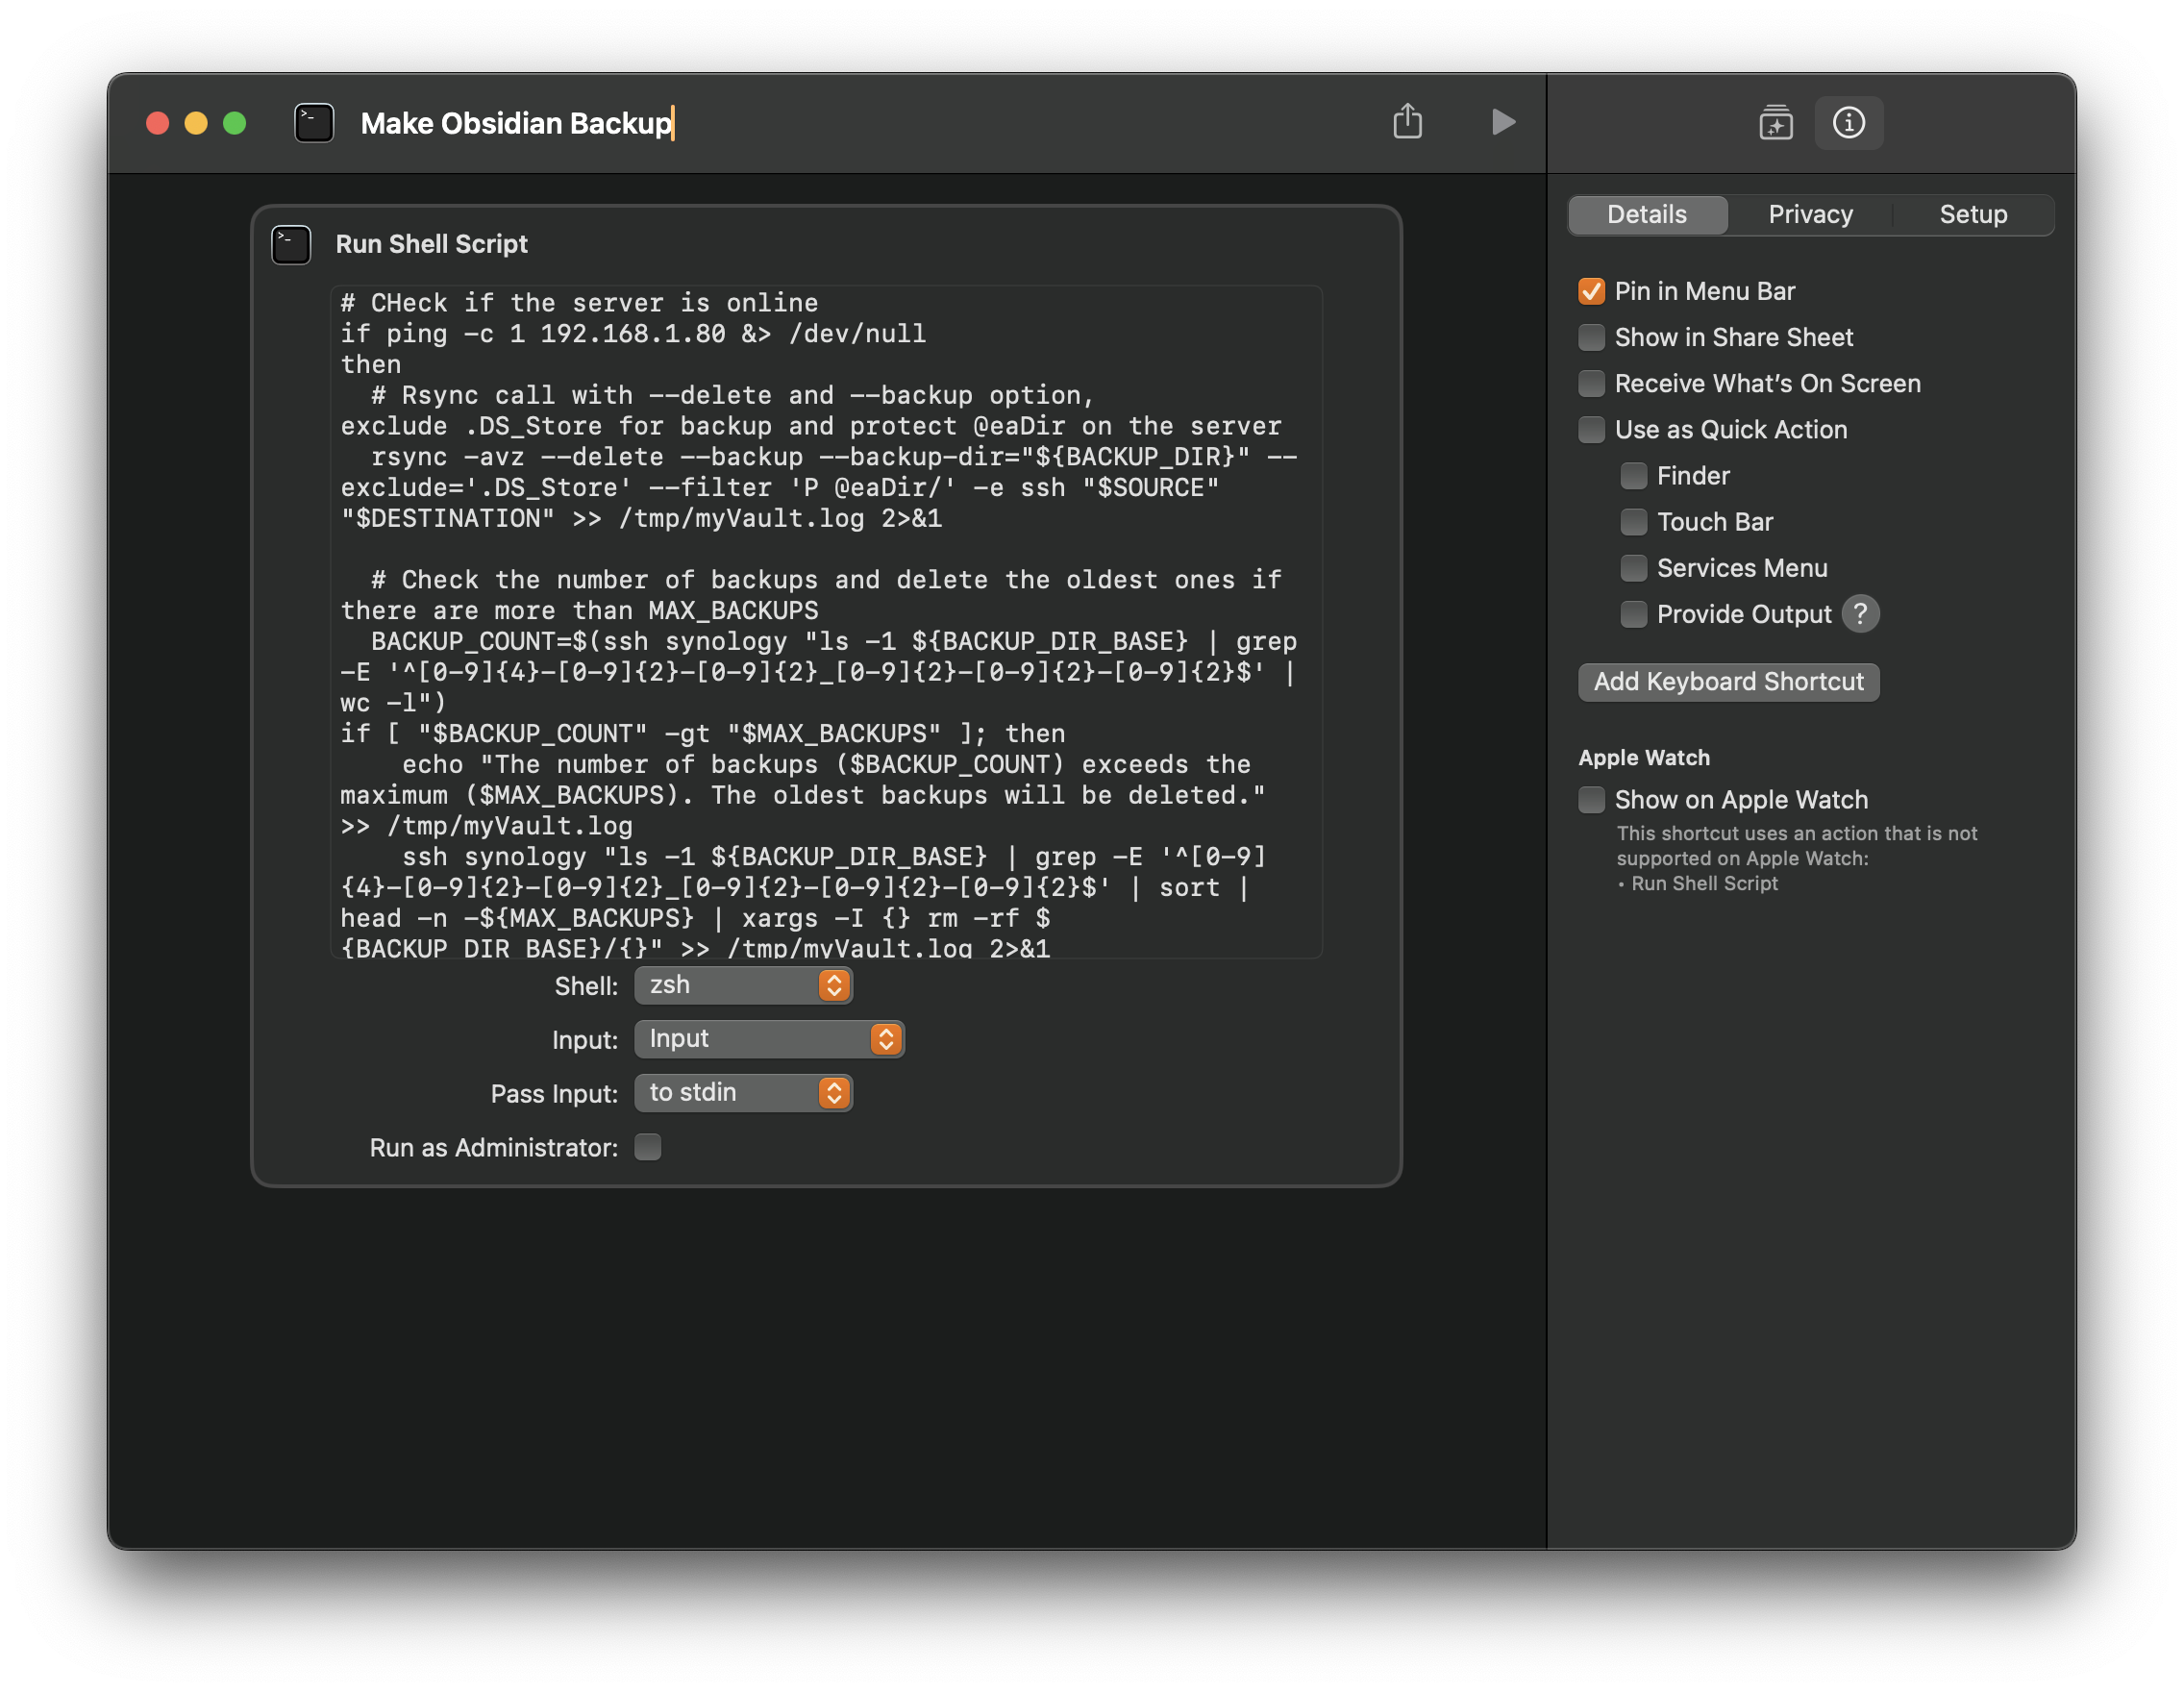
This works fine, when pressing the play button in the shortcut app. However, if executed via the menu bar, you may encounter error messages in the log file, such as
rsync error: some files could not be transferred (code 23) at /AppleInternal/Library/BuildRoots/91a344b1-f985-11ee-b563-fe8bc7981bff/Library/Caches/com.apple.xbs/Sources/rsync/rsync/main.c(996) [sender=2.6.9]It took some time to find the cause of this error. The “Shortcuts” application had been given the necessary permissions to edit “Files and folders” or “Full disk access” in the system settings under “Privacy and security”. Therefore, the script could run within this application. However, a shortcut called from the menu bar no longer runs in the Shortcuts application and should therefore be given these permissions itself. But this isn’t possible anymore, because Apple allows only real applications to have these permissions. The solution is to encapsulate the script in an application using Automator, Apple Script Editor, or Platypus, which I found in this article: launchd — How to run a LaunchAgent that runs a script which…
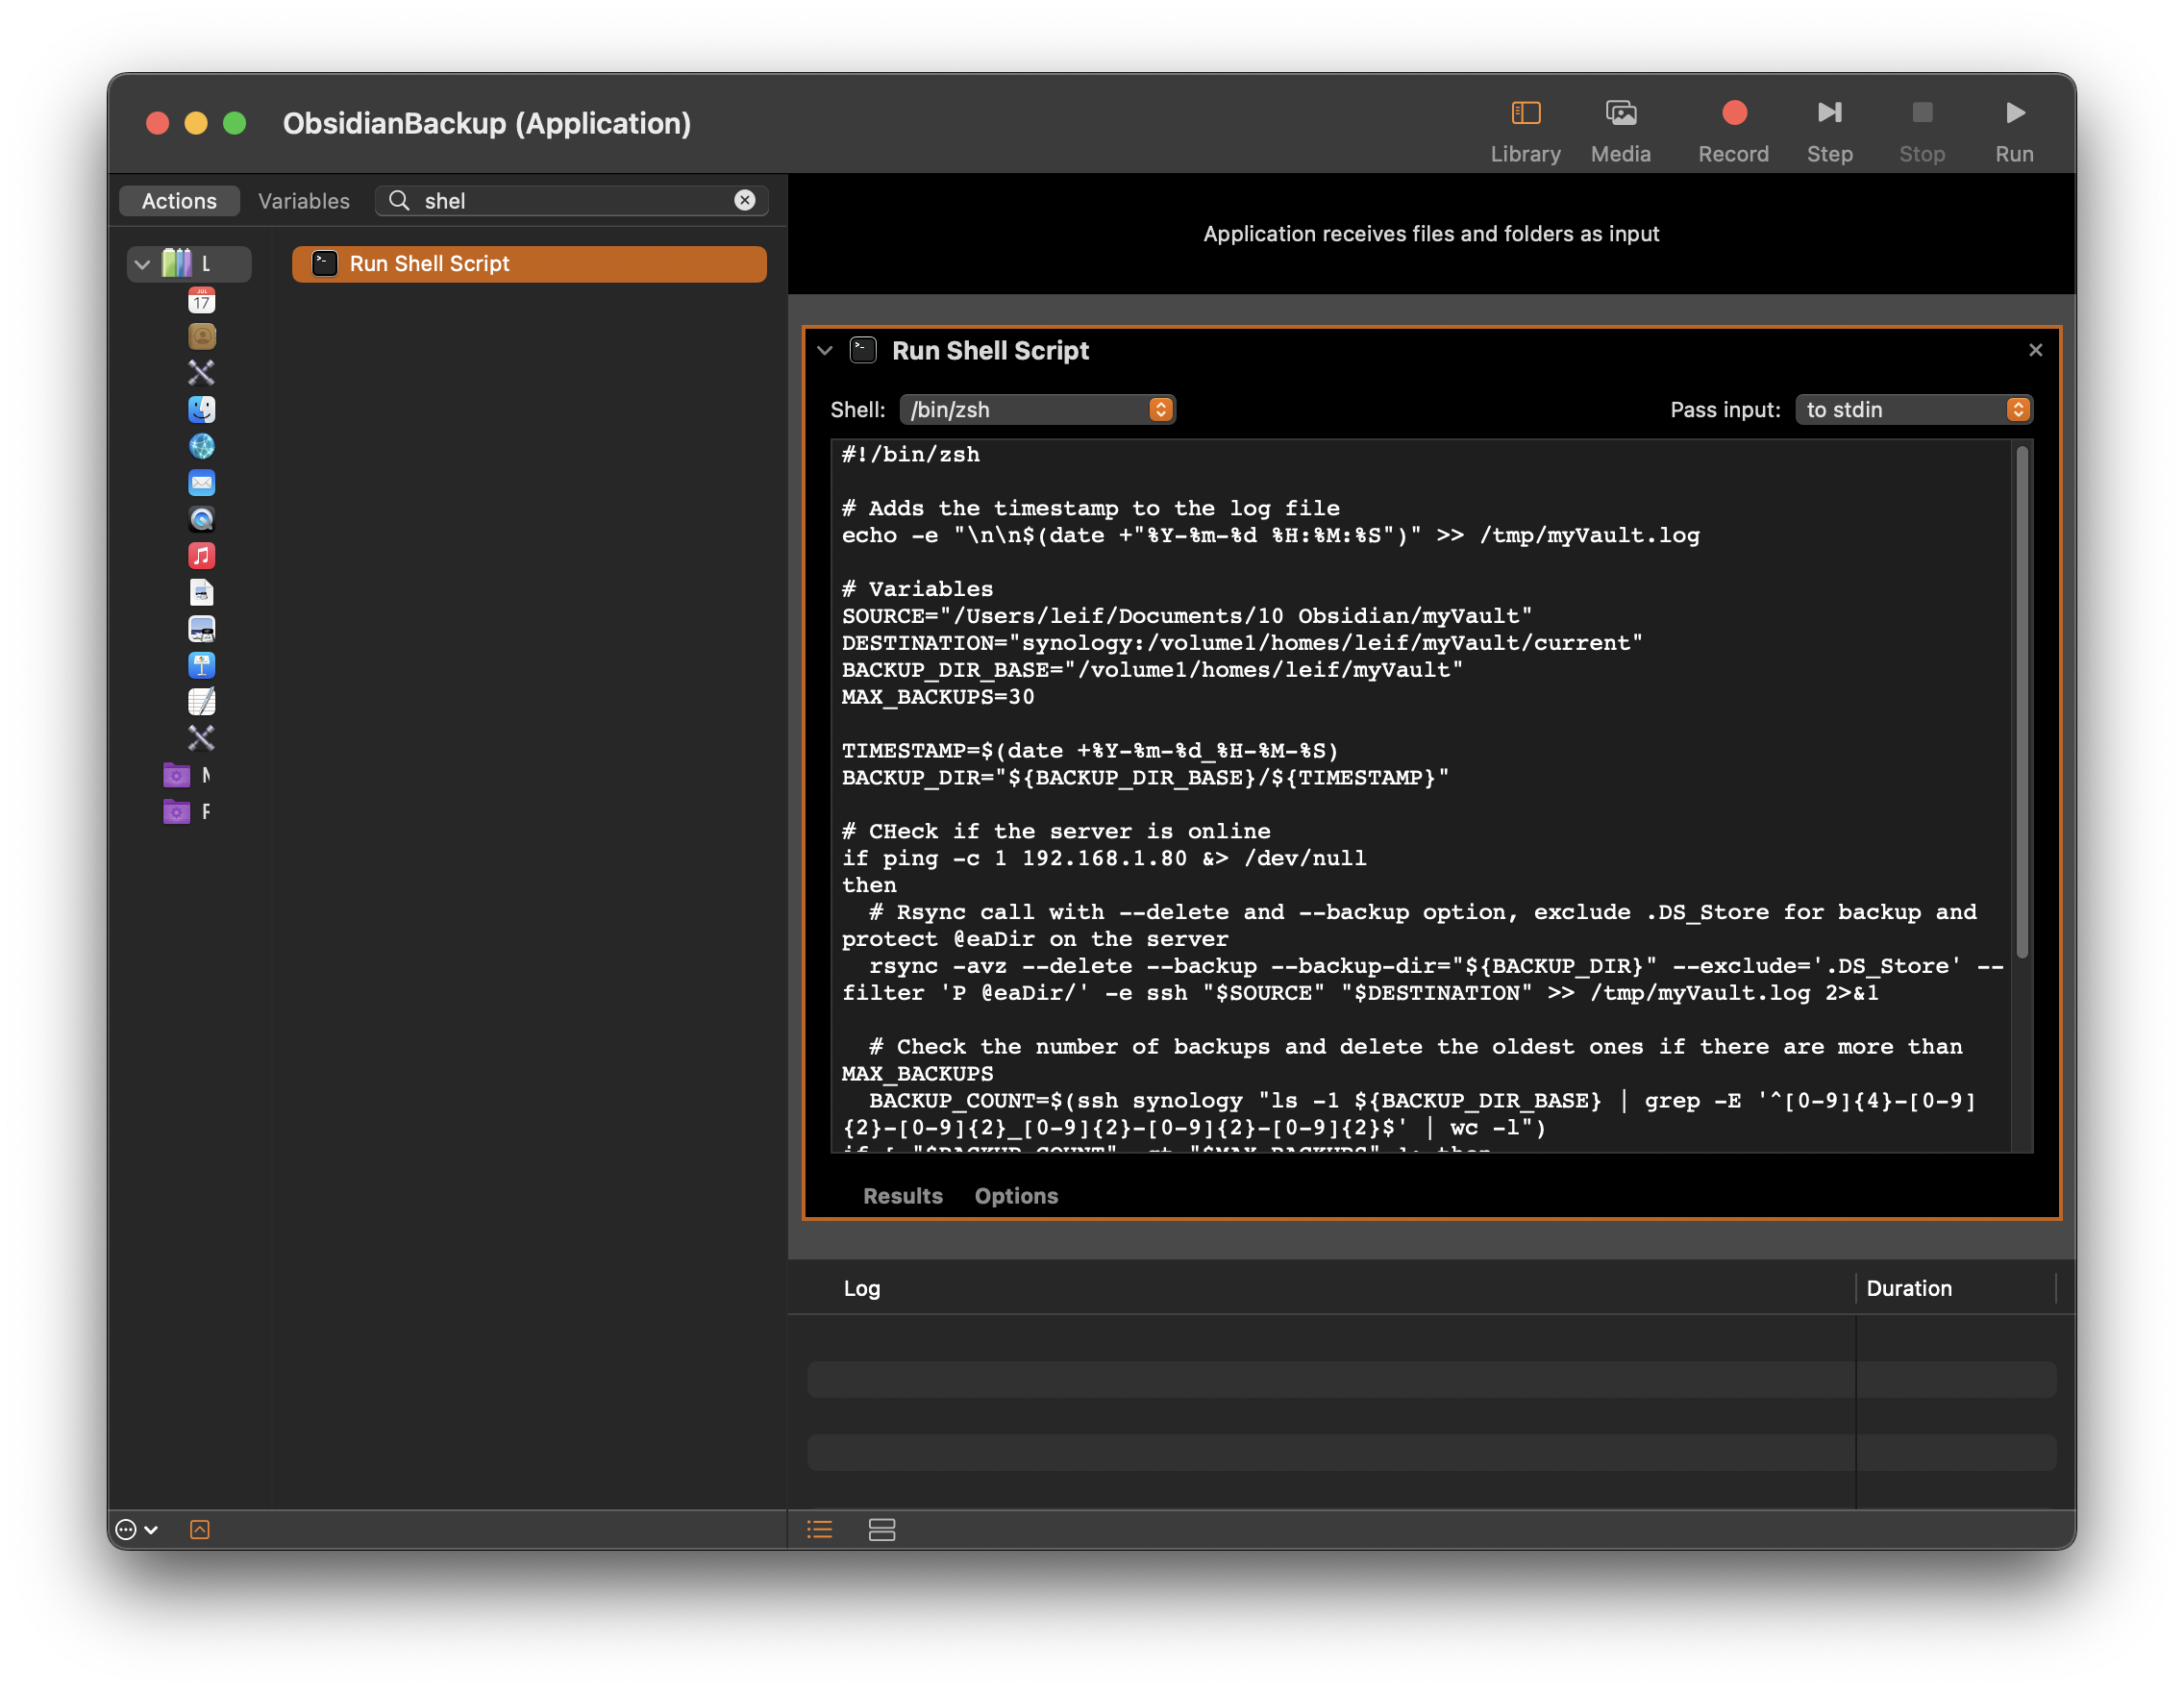
I decided to go with Automator to turn the script into a application:
- Open Automator: Start Automator and create a new document.
- Select Document Type: Choose “Application” as the document type.
- Add Action: Search for the action “Run Shell Script”.
- Copy Script: Copy the script into the “Run Shell Script” action.
- Save the Application: Save the result in ~/Applications as, for example, ObsidianBackup.
After saving the script in Automator as application, grant it the necessary permissions in the “Privacy & Security” System Settings:
- Go to “System Preferences” > “Security & Privacy” > “Privacy”.
- Select “Files and Folders” and add the application again.
You can also simply click the application icon twice. Normally, you will be asked to allow access to the specific folder, in this case, Documents.
By following these instructions, the script can be executed with a single click using Apple Shortcuts, ensuring it runs smoothly and with the necessary permissions.
- Create an empty new shortcut an add only one action “Open App”.
- Choose ObsidianBackup as app. Done!
If the app is not in the drop-down menu, start the app once by clicking the icon. You might also need to restart the Shortcuts app, but then the app should appear in the menu.
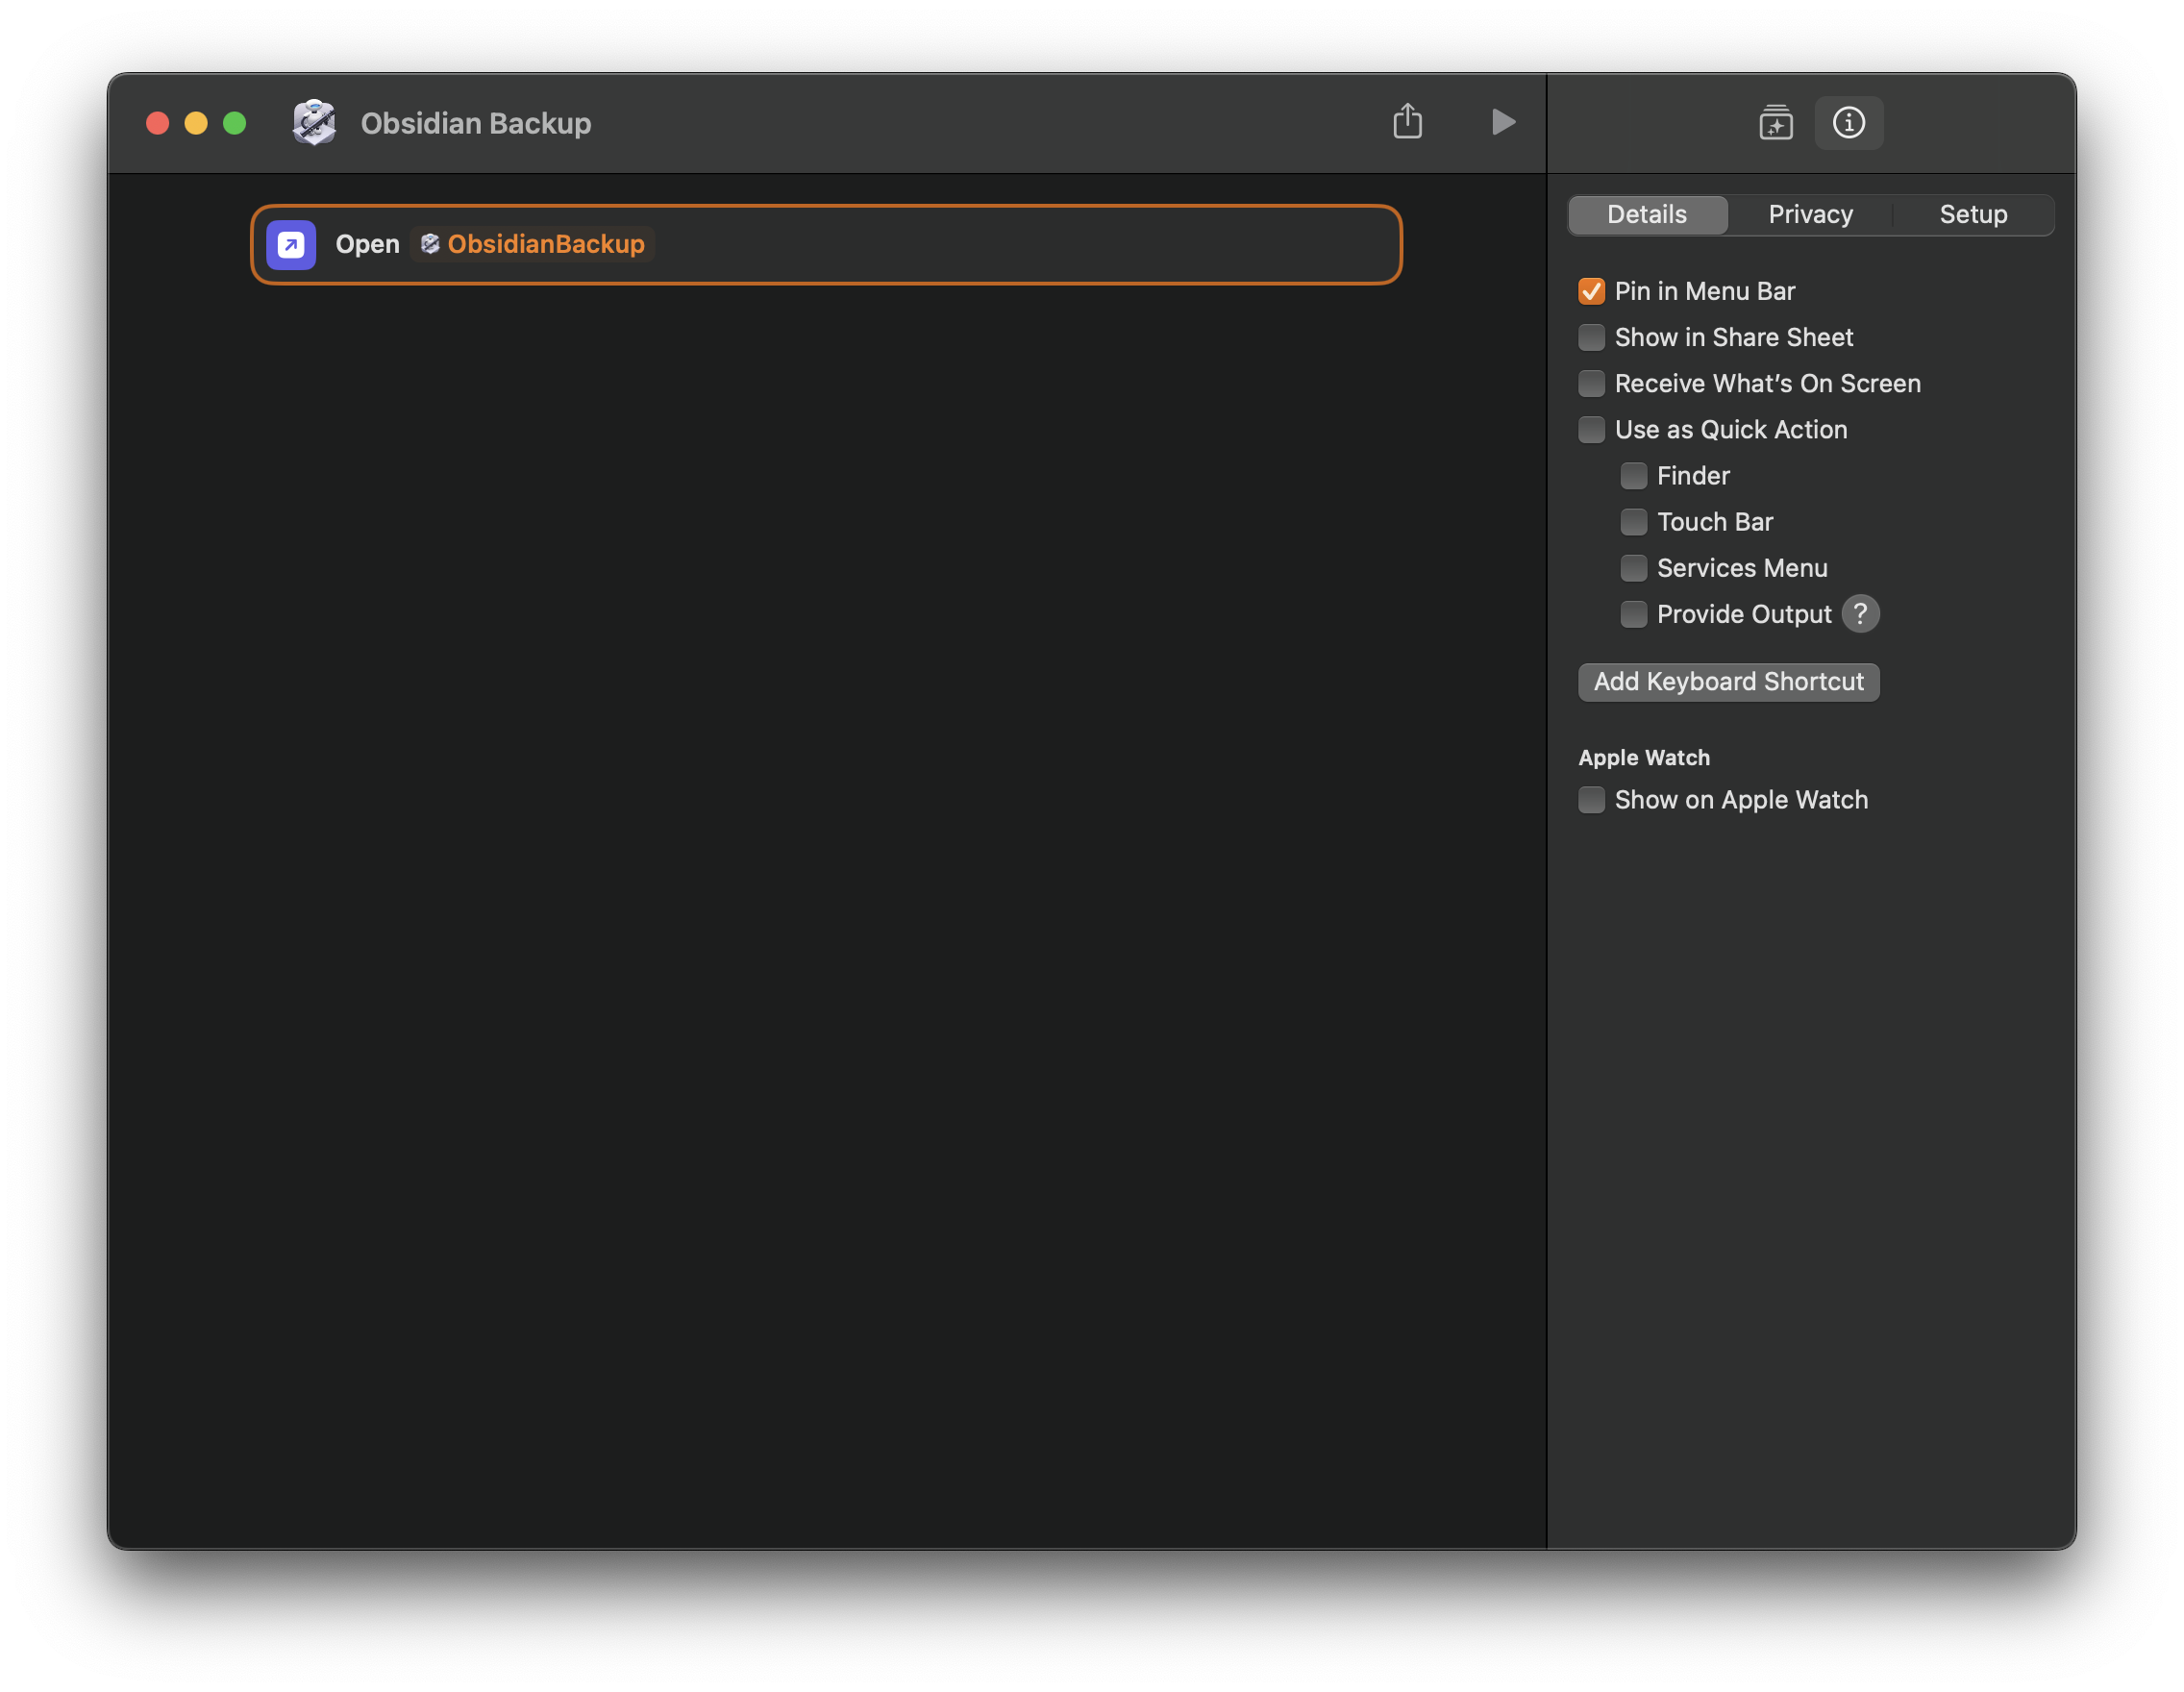
With that, the backup can just be started with a click on the Shortcuts menu.
BTW, I was wondering why all my other shortcuts which manipulate Obsidian notes run without any permission problems, as well as some Python scripts I run via the Alfred app. This is because these operations run inside apps which I have allowed to manipulate files or folders with the necessary permissions
Creating a Launchd ‘plist’ File
Now we can back up the Obsidian Vault or any other folder with a click in the menu bar. But how can we run the script automatically, e.g., every hour? The solution for running scripts periodically on macOS is the launchd system and service manager. launchd uses property list (plist) files to define services, specifying details like when they should start, their run conditions, and any dependencies. Here’s the plist file to run the ObsidianBackup.app every hour:
<?xml version="1.0" encoding="UTF-8"?>
<!DOCTYPE plist PUBLIC "-//Apple//DTD PLIST 1.0//EN" "http://www.apple.com/DTDs/PropertyList-1.0.dtd">
<plist version="1.0">
<dict>
    <key>Label</key>
    <string>com.leif.ObsidianBackup</string>
    <key>ProgramArguments</key>
    <array>
        <string>/usr/bin/open</string>
        <string>-W</string>
        <string>/Users/leif/Applications/ObsidianBackup.app</string>
    </array>
    <key>RunAtLoad</key>
    <true/>
    <key>StartInterval</key>
    <integer>3600</integer>
</dict>
</plist>
Save this file as ~/Library/LaunchAgents/com.leif.ObsidianBackup.plist. This ensures that the backup task will only run when you are logged in with your user account. The name of the plist file and the Label key should be the same. The ProgramArguments key defines the command line with which our ObsidianBackup app will be executed. Each part of the command line, separated by a space, is an item in the array. Although we save it as ObsidianBackup, the name at the command line level is ObsidianBackup.app. The RunAtLoad key instructs launchd to start the program when you log in, and the StartInterval defines the time between runs of the backup in seconds.
Now start the service with:
launchctl load ~/Library/LaunchAgents/com.leif.ObsidianBackup.plistYou can check if the service is running with:
launchctl list | grep com.leif.ObsidianBackupand by looking into the log file /tmp/myVault.log. If something goes wrong, you can stop the job with:
launchctl unload ~/Library/LaunchAgents/com.leif.ObsidianBackup.plistIf you want to delete the service, first unload it and then delete the file:
rm ~/Library/LaunchAgents/com.leif.ObsidianBackup.plistConclusions and open questions
With this setup, you should be able to easily run an hourly backup of your Obsidian Vault or any other folder on your Mac.
During the development of the script, with some help from ChatGPT 4o, I encountered two issues that I haven’t resolved yet.
1. Spaces in Folder Paths:
I usually make my backups in the folder /volume1/home/leif/98 Backups, but I had issues with the space in the folder name when using variables for the DESTINATION and BACKUP_DIR_BASE. To work around this, I created a folder without spaces on my Synology home directory.
2. Permissions with Dedicated Shared Folder:
Due to the problem mentioned above and the issue with @eaDir, I tried creating a dedicated shared folder that would not be indexed by “Universal Search”. However, I encountered some permissions problems. Despite setting all permissions correctly (as far as I understood), the permissions issues persisted. As result I stay with the solution with a folder with no spaces in my Synology home directory.
If anyone has tips for solving these issues, they would be greatly appreciated.
Additional Considerations
• Excluding the .obsidian Folder:
The current script copies the .obsidian settings folder as well. Most changes occur in this folder while working in Obsidian, so it might be a good idea to skip this folder. The notes are the critical data to save, while settings and plugins can be reinstalled if necessary.
• Adjusting MAX_BACKUPS:
The MAX_BACKUPS=30 value is just a guess and should be adjusted according to your specific needs.
Feel free to add any comments, corrections, or criticisms.
Leave a Reply